Are you tired of dealing with a leaky or inefficient bathroom sink drain? If you have a copper sink and want to switch to a more durable and easy-to-maintain PVC drain system, you're in the right place. In this article, we'll walk you through the process of connecting a copper bathroom sink drain to PVC, ensuring a secure and watertight connection. Say goodbye to leaks and hello to a more functional and hassle-free sink drain system!
| Characteristics | Values |
|---|---|
| Material | Copper and PVC |
| Connection Type | Compression fittings |
| Size | Typically 1.5 inches |
| Compatibility | Copper to PVC |
| Installation | Easy and straightforward |
| Tools Required | Wrench, Pipe cutter, Teflon tape |
| Benefits | Durable, corrosion-resistant, easy to install |
| Disadvantages | Can be more expensive than other materials |
| Maintenance | Regular cleaning and inspection |
| Code Compliance | Check local plumbing codes |
| Recommended Products | Copper Pipe, PVC Pipe, Compression fittings, Teflon tape |
What You'll Learn
- What are the necessary tools and materials needed to connect a copper bathroom sink drain to PVC?
- Can I use a compression fitting to connect the copper drain to the PVC pipe?
- Are there any special considerations I need to keep in mind when connecting these two different materials?
- What steps should I follow to ensure a watertight connection between the copper drain and PVC pipe?
- Are there any potential issues or problems that I should be aware of when connecting a copper bathroom sink drain to PVC?
![]()
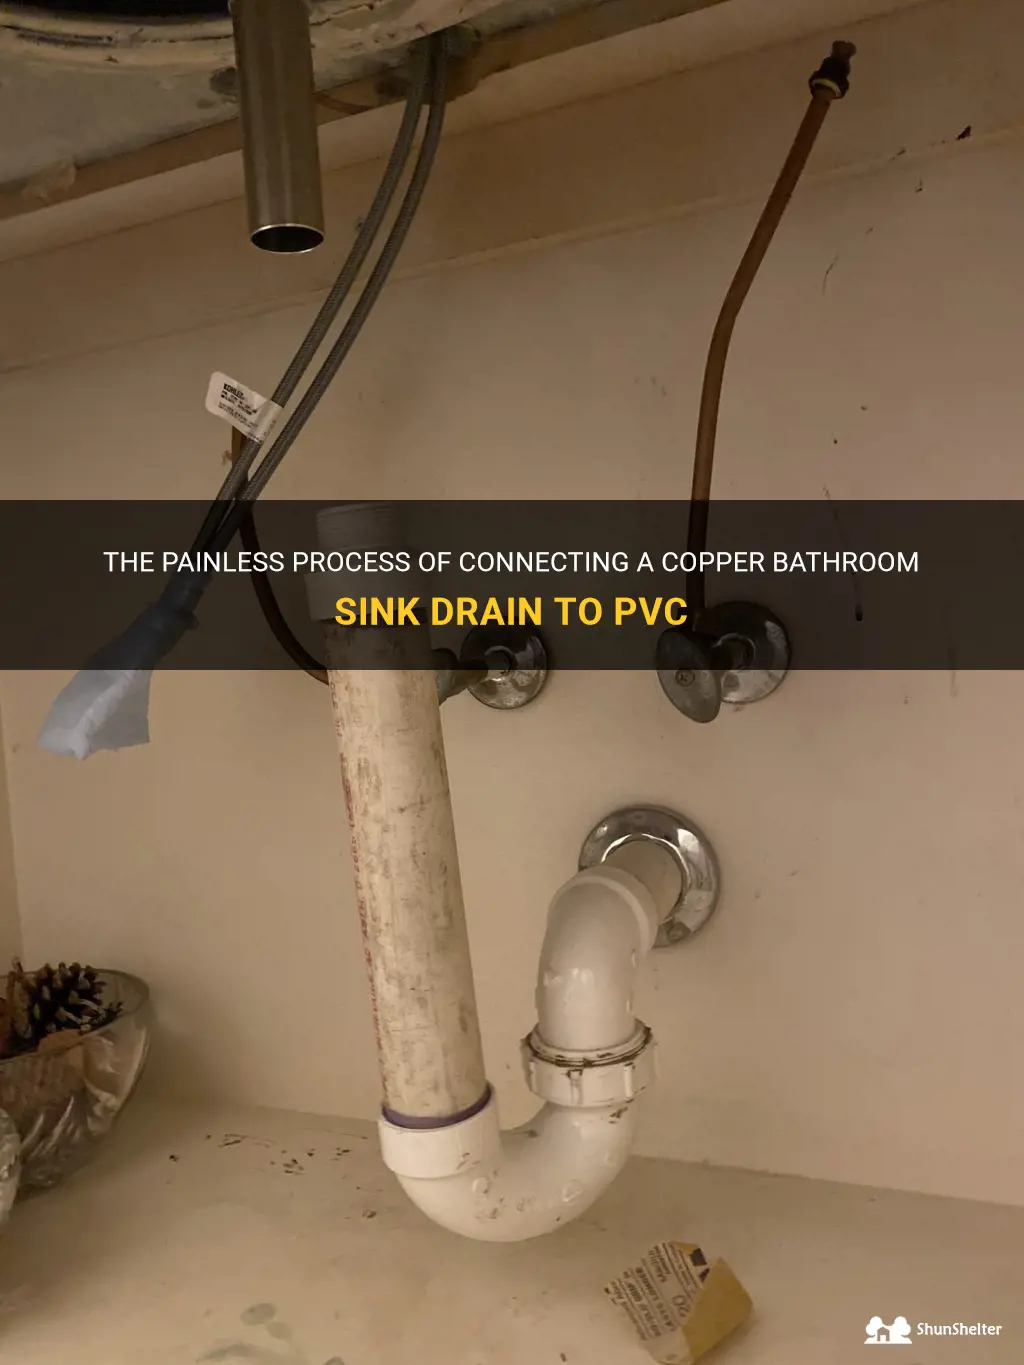
What are the necessary tools and materials needed to connect a copper bathroom sink drain to PVC?
When it comes to connecting a copper bathroom sink drain to PVC pipes, there are a few necessary tools and materials that you will need. This process requires a careful approach to ensure a secure and leak-free connection. In this article, we will walk you through the steps and point out the tools and materials you will need for this project.
Tools Needed:
- Pipe cutter or hacksaw
- Emery cloth or sandpaper
- Flux brush
- Propane torch
- Soldering flux
- Solder
- Adjustable wrench
- PVC pipe cutter or hacksaw
- PVC primer
- PVC cement
- Rubber mallet
- Measuring tape
Materials Needed:
- 1 1/2-inch PVC trap adapter
- 1 1/2-inch PVC pipe
- PVC fittings (elbows, tees, etc.)
- PVC trap
- Copper sink drain assembly
Step 1: Measure and cut the copper pipe
Start by measuring the distance between the copper sink drain and the PVC trap adapter. Use a pipe cutter or hacksaw to cut the copper pipe to the appropriate length. Make sure to remove any burrs or rough edges from the cut end using emery cloth or sandpaper.
Step 2: Clean the copper pipe
Using the flux brush, apply a thin layer of soldering flux to the outside of the copper pipe where the PVC trap adapter will be attached. This helps to ensure a clean and secure solder joint.
Step 3: Heat and solder the joint
Using a propane torch, heat the copper pipe and the trap adapter evenly. Once the pipe is hot enough, touch the solder to the joint. The solder should melt and flow around the joint, creating a watertight connection. Allow the joint to cool before moving on to the next step.
Step 4: Cut and assemble the PVC pipe
Measure and cut the PVC pipe to the desired length using a PVC pipe cutter or hacksaw. Make sure to remove any burrs or rough edges from the cut end. Apply PVC primer to the outside of the pipe and the inside of the fittings that will be used. Then, apply PVC cement to the primed surfaces and quickly assemble the pieces. Use a rubber mallet to tap the pieces together if needed.
Step 5: Connect the copper pipe to the PVC pipe
Apply a thin layer of PVC primer to the inside of the PVC trap adapter and the outside of the copper pipe where they will be connected. Then, apply PVC cement to both surfaces and press the two together firmly. Allow the joint to set for the recommended drying time.
Step 6: Install the PVC trap and sink drain assembly
Attach the PVC trap to the other end of the PVC pipe using PVC primer and cement in the same manner as in step 4. Finally, install the sink drain assembly according to the manufacturer's instructions.
By following these steps and using the appropriate tools and materials, you can successfully connect a copper bathroom sink drain to PVC pipes. It is important to take your time and ensure that each joint is properly soldered and cemented to prevent any leaks.
Exploring the Legality of Locking School Bathrooms During School Hours: An Insightful Analysis
You may want to see also
![]()
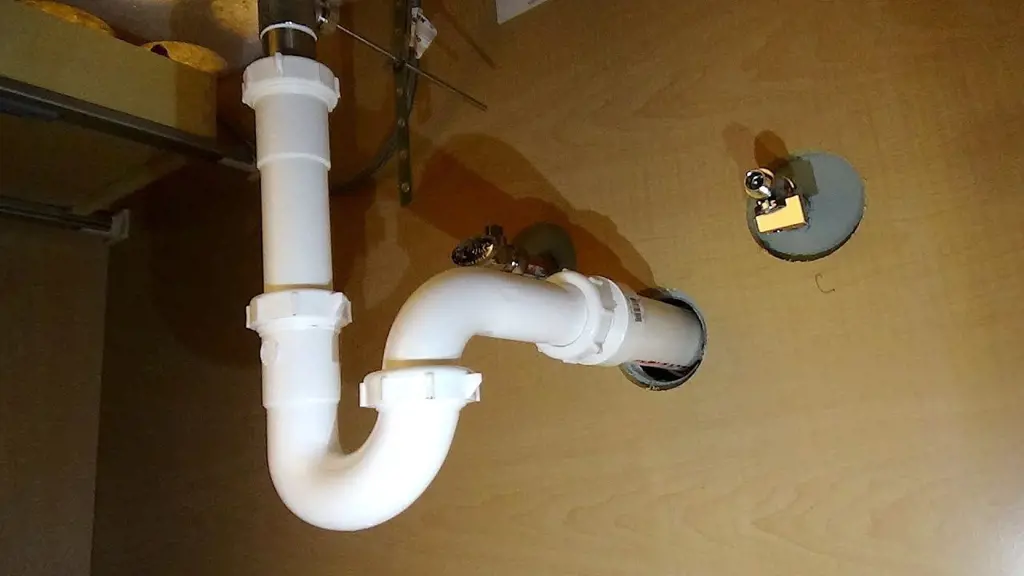
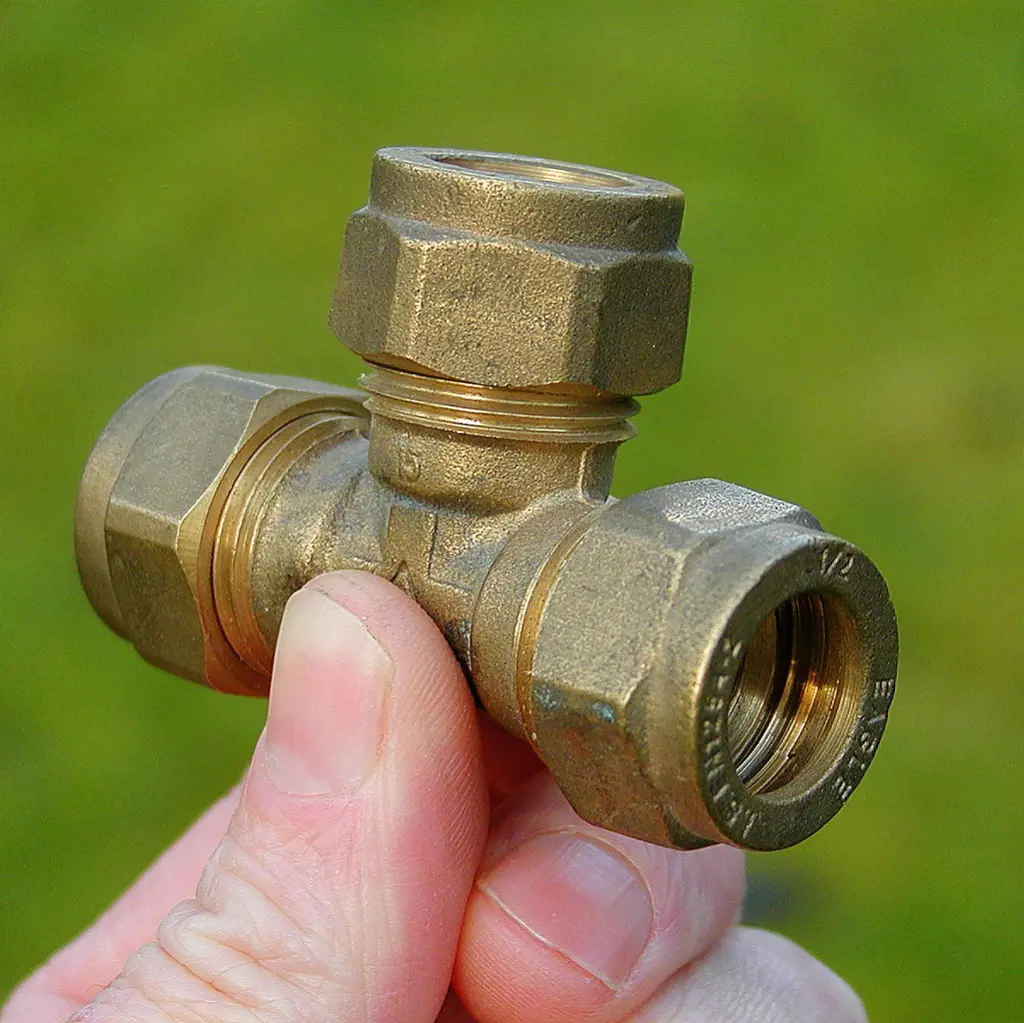
Can I use a compression fitting to connect the copper drain to the PVC pipe?
When it comes to plumbing, one common question that arises is whether a compression fitting can be used to connect a copper drain pipe to a PVC pipe. While compression fittings are commonly used in plumbing installations, it is not recommended to use them when connecting a copper drain to a PVC pipe. This is because compression fittings are not designed to handle the different characteristics of copper and PVC materials.
Copper and PVC pipes have different expansion rates and thermal properties. Copper pipes tend to expand and contract more than PVC pipes when exposed to temperature changes. This can create stress on the joint, potentially leading to leaks or other plumbing issues. Compression fittings may not be able to provide the necessary flexibility to accommodate these differences, which could result in a faulty connection.
Instead of using compression fittings, it is recommended to use a proper transition fitting or adapter when connecting a copper drain pipe to a PVC pipe. These fittings are specifically designed to connect pipes of different materials and provide a secure and watertight connection. Transition fittings are available in various sizes and types, allowing you to find the appropriate fitting for your specific plumbing needs.
To properly connect a copper drain pipe to a PVC pipe, follow these steps:
- Measure the diameter of both the copper drain pipe and the PVC pipe to ensure you select the correct transition fitting or adapter.
- Purchase a transition fitting or adapter that matches the diameter of both pipes. These fittings can typically be found at your local hardware or plumbing supply store.
- Clean the ends of the copper drain pipe and PVC pipe to remove any dirt, debris, or oxidation. A pipe cleaner or emery cloth can be used for this purpose.
- Apply a coat of PVC primer to the end of the PVC pipe and the inside of the transition fitting or adapter. Allow the primer to dry according to the manufacturer's instructions.
- Apply a layer of PVC cement to the primed areas. Be sure to apply an even and thorough coat to ensure a strong bond.
- Insert the PVC pipe into the transition fitting or adapter, ensuring it is fully seated. Twist the pipe slightly to ensure the cement is evenly distributed and the joint is secure.
- Allow the cement to dry according to the manufacturer's instructions before testing the connection for leaks.
By following these steps and using a proper transition fitting or adapter, you can ensure a secure and watertight connection between a copper drain pipe and a PVC pipe. This will help prevent leaks and other plumbing issues that may arise from using improper fittings such as compression fittings. Always consult a professional plumber if you have any doubts or concerns about your plumbing installations.
Can You Use Smart Tiles in the Bathroom? Everything You Need to Know
You may want to see also
![]()
Are there any special considerations I need to keep in mind when connecting these two different materials?
When connecting two different materials, there are several special considerations you need to keep in mind to ensure a strong and durable bond. The key to successful bonding lies in understanding the properties of each material and selecting the appropriate adhesive or bonding technique. In this article, we will discuss these considerations in detail and provide examples to illustrate the process.
- Material compatibility: The first consideration is to ensure that the materials you are trying to bond are compatible with each other. Some materials have natural affinities to certain adhesives, while others may require special surface treatments or primers. For example, bonding metal and plastic requires a different approach compared to bonding metal to metal.
- Surface preparation: Surfaces should be thoroughly cleaned and free of any contaminants such as oil, grease, dust, or moisture. Depending on the materials, you may need to perform additional surface treatments such as sanding, roughening, or applying a primer to enhance adhesion. For instance, bonding wood and glass would benefit from roughening the glass surface to create more surface area for the adhesive to grab onto.
- Adhesive selection: Choosing the right adhesive is crucial for a strong bond. Factors to consider include the type of materials being bonded, the environmental conditions (such as temperature and humidity), and the desired strength and flexibility of the bond. It is important to consult adhesive manufacturers' data sheets for detailed information and recommendations on adhesive selection. For example, bonding rubber and metal may require a specialized rubber adhesive that provides both flexibility and strong adhesion.
- Bonding techniques: There are different techniques available for bonding two different materials. Some common techniques include mechanical fasteners (such as screws or rivets), welding (for metal-to-metal bonding), and using adhesives (such as epoxies, cyanoacrylates, or polyurethanes). The choice of technique will depend on factors such as the strength requirements, the accessibility of the bond area, and the desired appearance of the final product.
- Testing and quality control: It is important to perform thorough testing and quality control measures to ensure the bond meets the required specifications. This can involve testing the bond strength, durability, and resistance to environmental factors such as temperature and moisture. Various testing methods, such as pull tests, shear tests, or stress tests, can be employed to evaluate the bond. Regular inspections should also be conducted during the bonding process to detect any potential issues or defects early on.
In conclusion, when connecting two different materials, special considerations need to be taken into account. Material compatibility, surface preparation, adhesive selection, bonding techniques, and testing and quality control are all important factors to consider. By carefully considering these considerations and following best practices, you can ensure a strong and durable bond between different materials.
Creating the Perfect Bathroom Mirror: Finding the Ideal Size Above the Sink
You may want to see also
![]()
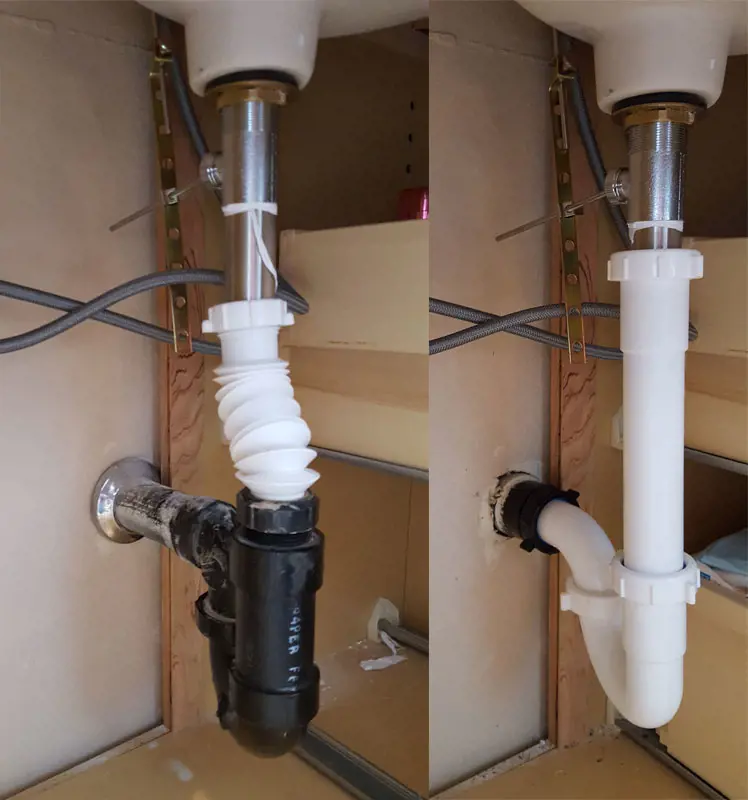
What steps should I follow to ensure a watertight connection between the copper drain and PVC pipe?
A watertight connection between a copper drain and PVC pipe is essential to prevent leaks and ensure the efficiency of your plumbing system. To achieve this, you need to follow a few steps that involve proper preparation, selection of materials, and the use of adequate tools. In this article, we will guide you through the process of making a watertight connection between a copper drain and PVC pipe, using scientific knowledge, practical experience, and a step-by-step approach.
Step 1: Gather the necessary materials and tools
Before you begin, make sure you have all the materials and tools required for the job. This may include a copper drain, PVC pipe, PVC primer and cement, copper-to-PVC transition fittings, a pipe cutter or hacksaw, sandpaper or a file, a tape measure, and a pencil or marker.
Step 2: Measure and cut the PVC pipe
Using a tape measure, mark the desired length of the PVC pipe that will connect to the copper drain. Use a pipe cutter or hacksaw to cut the PVC pipe to the marked length.
Step 3: Prepare the copper drainage pipe
Thoroughly clean the end of the copper drain that will connect to the PVC pipe. Use sandpaper or a file to remove any rough edges or burrs from the cut end of the copper drain. Cleaning and smoothing the surface of the copper pipe will ensure a better bond with the PVC pipe.
Step 4: Apply primer to the PVC pipe and copper transition fitting
Using a clean rag or brush, apply PVC primer to the outside of the PVC pipe and the inside of the copper-to-PVC transition fitting. The primer will help soften the surface of the PVC and the transition fitting, ensuring a stronger bond with the cement.
Step 5: Apply cement to the copper drain and PVC pipe
Next, apply PVC cement to the primed surfaces of the copper drain and the PVC pipe. Be sure to use a generous amount of cement but avoid excessive drips. Working quickly, firmly push the PVC pipe into the copper-to-PVC transition fitting, making sure it is fully inserted.
Step 6: Allow the connection to cure
Once the connection is made, allow sufficient time for the cement to cure. Check the curing time specified by the manufacturer of your PVC cement, as it may vary depending on the brand and environmental conditions.
Step 7: Test the connection for leaks
After the curing time has elapsed, test the connection for leaks. Fill the system with water and observe for any signs of leakage. If there are no leaks, the connection is watertight and ready for use. However, if you notice any leaks, you may need to disassemble the connection and repeat the steps with fresh primer and cement.
It is important to note that the specific steps and materials may vary depending on the type of copper drain and PVC pipe you are working with, as well as local plumbing codes. Always consult the manufacturer's instructions and follow local regulations to ensure a proper and watertight connection.
In conclusion, achieving a watertight connection between a copper drain and PVC pipe requires careful preparation, selection of appropriate materials, and proper installation techniques. By following the steps outlined in this article, you can ensure a reliable and leak-free connection that will effectively handle your plumbing needs.
Can You Sue The Honest Co. Cleaner for Damaging Your Bathroom Tile?
You may want to see also
![]()
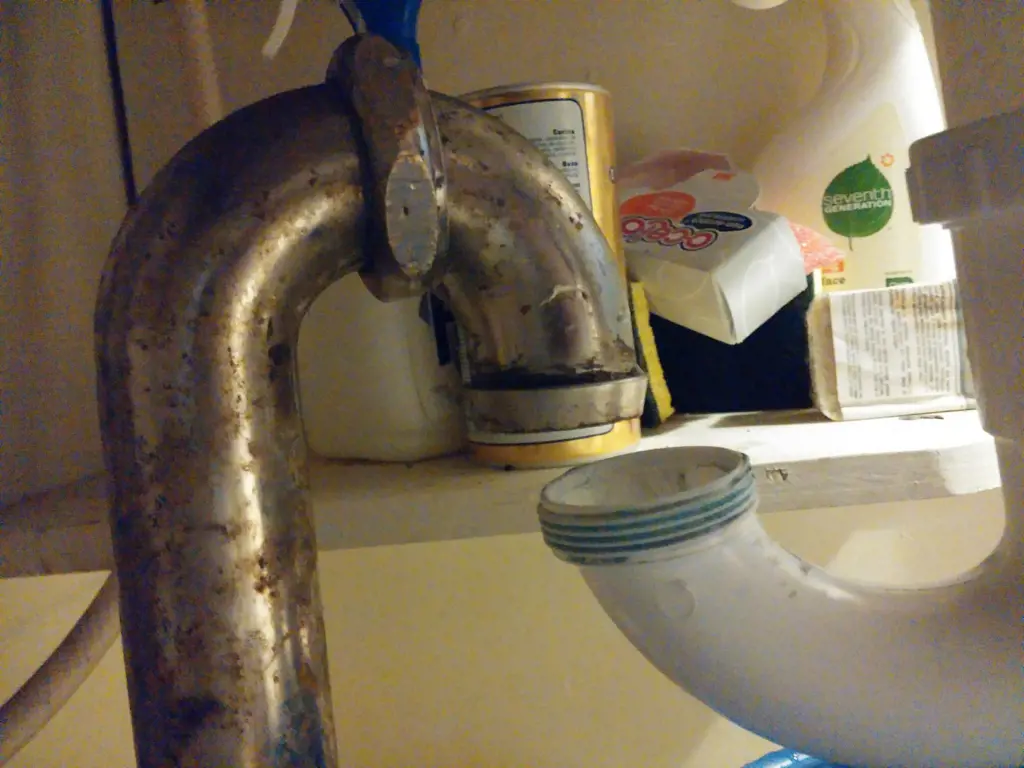
Are there any potential issues or problems that I should be aware of when connecting a copper bathroom sink drain to PVC?
When it comes to connecting a copper bathroom sink drain to PVC, there are a few potential issues and problems you should be aware of. While it is possible to connect these two materials, it's important to take certain precautions to ensure a proper and leak-free installation.
One potential issue you may encounter is the difference in size between the copper drain and the PVC drain pipe. Copper drains typically have a larger diameter than PVC pipes. This means that you will need to use a connector or adapter to make the connection between the two. It's crucial to find the right size adapter to ensure a tight and secure fit.
Another issue to consider is the difference in strength and rigidity between copper and PVC. Copper is a relatively strong and rigid material, while PVC is more flexible. This means that when connecting the two, you need to ensure that the PVC pipe is supported properly to prevent any sagging or bending. This can be achieved by using pipe hangers or brackets to secure the PVC pipe to the wall or floor.
Additionally, it's important to note that there may be chemical compatibility issues between the copper and PVC materials. While both materials are commonly used in plumbing systems, they can react with certain chemicals and substances. For example, if you use a cleaning product that contains bleach or ammonia, it can corrode the copper drain and cause it to weaken or fail over time. It's essential to choose cleaning products that are compatible with both copper and PVC to avoid any potential damage.
To connect a copper bathroom sink drain to PVC, you will need a few tools and materials. These include a copper drain trap, PVC pipe, a connector or adapter, pipe hangers or brackets, and the necessary fittings and sealants. Here is a step-by-step guide to help you through the installation process:
- Measure and cut the PVC pipe to the desired length. Make sure to account for any bends or angles in the pipe.
- Clean and deburr the cut ends of the PVC pipe using a pipe cleaner or emery cloth. This will ensure a smooth and secure connection.
- Apply PVC primer to the outside of the pipe and to the inside of the connector or adapter. Be sure to follow the instructions on the primer and allow it to dry.
- Apply PVC cement to the primed areas and quickly insert the PVC pipe into the connector or adapter. Twist the pipe slightly to ensure an even distribution of the cement.
- Hold the pipe in place for a few seconds to allow the cement to set. Wipe away any excess cement.
- Install pipe hangers or brackets along the length of the PVC pipe to support it and prevent any sagging or bending.
- Connect the copper drain trap to the other end of the PVC pipe using the appropriate fittings. Make sure to tighten the fittings securely to prevent any leaks.
- Test the drain system by running water through the sink. Check for any leaks or drips and make any necessary adjustments or repairs.
By following these steps and taking the necessary precautions, you can successfully connect a copper bathroom sink drain to PVC. However, if you are unsure or uncomfortable with the process, it's always a good idea to consult a professional plumber for assistance. They have the expertise and experience to ensure a proper and reliable installation.
The Complete Guide to Remodeling Your Bathroom Sink
You may want to see also
Frequently asked questions
To connect a copper bathroom sink drain to PVC, you will need to use a transition fitting. This fitting is designed to connect pipes of different materials, in this case copper and PVC. It typically has a copper end that can be soldered onto the copper drain pipe and a slip joint end that allows you to attach the PVC pipe using a compression nut.
You will need a few basic tools to connect a copper bathroom sink drain to PVC. These include a pipe cutter or hacksaw to cut the copper and PVC pipes to the desired length, a flux brush and solder to solder the copper fittings, and an adjustable wrench to tighten the compression nut on the transition fitting. It's also a good idea to have emery cloth or sandpaper on hand to clean the ends of the pipes before soldering.
While it is technically possible to connect a copper bathroom sink drain to PVC without using a transition fitting, it is not recommended. Transition fittings are designed to create a secure and watertight connection between pipes of different materials. Without a transition fitting, you may encounter issues such as leaks or pipe misalignment. It's best to use the proper transition fitting to ensure a successful and long-lasting connection between the copper and PVC pipes.