
Basement walls can often pose a challenge when it comes to moisture and water intrusion. However, there is a solution that can help strengthen and waterproof these walls: epoxy injection. By injecting epoxy into the cracks and voids of a basement wall, you can effectively seal and repair any damage, providing a long-lasting solution. In this guide, we will take a closer look at the process of injecting epoxy in a basement wall, its benefits, and how it can transform your space into a dry and secure area for years to come.
| Characteristics | Values |
|---|---|
| Epoxy Type | |
| Mixing Ratio | |
| Injection Pressure | |
| Injection Ports | |
| Curing Time | |
| Temperature Range | |
| Surface Preparation | |
| Safety Measures |
What You'll Learn
- What are the steps involved in injecting epoxy into a basement wall?
- What tools and materials do I need to inject epoxy into a basement wall?
- Are there any safety precautions I should take before injecting epoxy into a basement wall?
- How long does it typically take for the epoxy to cure after injecting it into a basement wall?
- Are there any specific techniques or tips for ensuring proper penetration of the epoxy into the basement wall?
![]()
What are the steps involved in injecting epoxy into a basement wall?

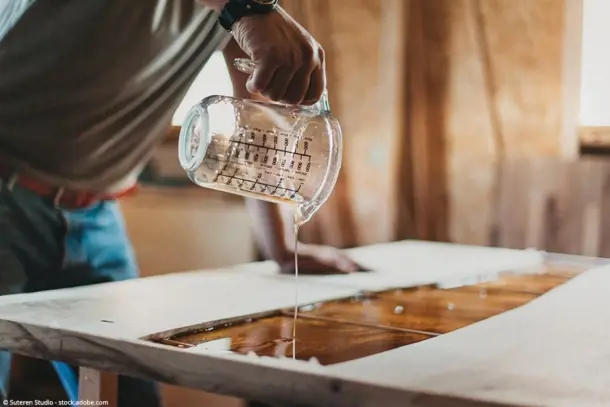
Injecting epoxy into a basement wall is a common technique used for repairing and reinforcing concrete structures. This process involves injecting a specialized epoxy resin into cracks and voids in the wall, which hardens and strengthens the area. If you're considering injecting epoxy into your basement wall, here are the steps involved in the process.
- Evaluate the wall: Before starting the injection process, it's important to evaluate the condition of the basement wall. Look for signs of cracks, voids, and water penetration. Assess the severity of the damage and determine if epoxy injection is the best solution for your specific situation. If the wall has extensive structural damage or is bowing, you may need to consult a professional engineer or contractor.
- Clean the surface: Proper preparation is crucial for the epoxy injection to be successful. Thoroughly clean the surface of the wall using a wire brush, scraper, or similar tools to remove loose particles, dirt, and debris. It's important to have a clean and dry surface to ensure good adhesion of the epoxy.
- Drill injection ports: Next, drill small holes into the wall at regular intervals where the epoxy will be injected. The size and spacing of the holes will depend on the size of the cracks and the type of epoxy being used. Generally, the holes should be spaced around every 6-12 inches along the length of the crack.
- Install injection ports: After drilling the holes, insert injection ports into each hole. Injection ports are small plastic or metal tubes that act as channels for the epoxy resin. They help to direct the resin into the cracks and ensure proper distribution. Secure the injection ports in place using a high-strength epoxy or adhesive.
- Seal cracks and voids: Before injecting the epoxy, it's important to seal any visible cracks or voids on the surface of the wall. This will prevent the epoxy from leaking out during the injection process. Use a non-shrinking epoxy paste or hydraulic cement to fill and seal the cracks. Allow the sealant to cure according to the manufacturer's instructions.
- Mix epoxy resin: Once the surface is prepared, it's time to mix the epoxy resin. Follow the manufacturer's instructions to ensure proper mixing ratios and consistency. Use a mechanical mixer or stir thoroughly by hand to achieve a uniform mixture. Avoid over-mixing, as this can introduce air bubbles into the epoxy.
- Inject the epoxy: Using a low-pressure injection system, begin injecting the epoxy resin into the first injection port. Apply steady pressure, slowly filling the crack from the bottom up. Move to the next injection port and repeat the process. Continue injecting epoxy until the crack is completely filled, and epoxy begins to flow out of adjacent ports. This indicates that the crack is saturated and properly sealed.
- Monitor and cleanup: After injecting the epoxy, it's important to monitor the repair area for a while to ensure the epoxy cures properly. Check for any signs of leaking or additional cracks forming. Once the epoxy has cured, usually within 24-48 hours, remove the injection ports and any excess epoxy using a chisel or grinder. Smooth out the surface for a neat and finished appearance.
It's worth noting that epoxy injection is a specialized process that requires proper training and equipment. If you're unsure about tackling this repair yourself, it's recommended to consult a professional contractor who has experience with epoxy injection and basement wall repairs. They can assess the situation and provide the appropriate solution for your specific needs.
Exploring the Feasibility of Building Houses with Basements in Decatur, Alabama
You may want to see also
![]()
What tools and materials do I need to inject epoxy into a basement wall?

Injecting epoxy into a basement wall can be an effective solution for sealing cracks and preventing water leakage. However, before starting the process, it is important to gather the necessary tools and materials to ensure a smooth and successful application. In this article, we will discuss the essential tools and materials needed for injecting epoxy into a basement wall.
Safety Equipment:
Before starting any project, it is crucial to prioritize safety. When working with epoxy, make sure to wear safety goggles, gloves, and a respirator to protect yourself from any potential health hazards.
Epoxy Injection Kit:
To properly inject epoxy into a basement wall, you will need an epoxy injection kit. This kit typically includes a two-part epoxy resin, epoxy injectors or ports, injection pumps, and all the necessary accessories. It is important to choose a high-quality epoxy injection kit that is specifically designed for basement wall repairs.
Surface Preparation Tools:
To ensure the epoxy adheres well to the basement wall, proper surface preparation is necessary. The following tools are typically required for surface preparation:
- Wire brush: Use a wire brush to remove loose debris, paint, and any other contaminants from the crack or the surrounding area of the basement wall.
- Chisel and hammer: If the crack is wide or has loose concrete, use a chisel and hammer to widen and clean the crack, creating a V-shaped groove. This will help create a better bond between the epoxy and the wall.
Crack Sealing Material:
Before injecting epoxy, it is important to seal the crack with a suitable crack sealing material. This material acts as a barrier to prevent the epoxy from leaking out while injecting. Common crack sealing materials include epoxy paste, polyurethane foam, or hydraulic cement.
Epoxy Injection Equipment:
The proper equipment is necessary for injecting epoxy into the basement wall. Some common tools and equipment include:
- Injection ports: These are small plastic or metal tubes that are inserted into the crack to provide access for the epoxy injection. They are typically attached to the wall using epoxy paste.
- Injection pumps: These pumps are used to push the epoxy resin into the crack under pressure. Manual injection pumps or pneumatic pumps can be used, depending on the size and complexity of the project.
Putty Knife or Trowel:
A putty knife or trowel is essential for applying the epoxy paste or crack sealing material to the crack and smoothing it out. It allows for easy filling and ensures a uniform application of the sealant.
Cleaning Solvents:
Cleaning solvents are necessary for cleaning the injection ports, tools, and equipment after use. Acetone or a similar solvent can be used to remove any residual epoxy and to ensure proper functioning of the equipment for future use.
Sandpaper:
If desired, sandpaper can be used to smoothen the surface of the epoxy repair after it has cured. This step is optional and depends on the desired finish and appearance.
In conclusion, successfully injecting epoxy into a basement wall requires the use of several tools and materials. These include safety equipment, an epoxy injection kit, surface preparation tools, crack sealing materials, epoxy injection equipment, putty knife or trowel, cleaning solvents, and sandpaper. When choosing these tools and materials, it is important to prioritize quality and select products specifically designed for basement wall repairs.
Curing Garlic in Your Basement: A Step-by-Step Guide to Preserve and Enhance Flavor
You may want to see also
![]()
Are there any safety precautions I should take before injecting epoxy into a basement wall?

Epoxy injection is a common method used to repair cracks in concrete structures such as basement walls. It involves injecting a liquid epoxy resin into the crack to bond and seal it. While this method is effective in repairing cracks and preventing water infiltration, it is important to take safety precautions to ensure a safe and successful epoxy injection process.
- Wear Personal Protective Equipment (PPE): Before starting the epoxy injection, it is crucial to wear appropriate PPE. This includes safety goggles to protect your eyes from epoxy splashes, rubber gloves to protect your hands from skin contact and irritation, and a respirator mask to prevent inhalation of epoxy fumes.
- Ventilate the area: Epoxy resins can release harmful fumes, especially during the curing process. Therefore, it is important to ensure proper ventilation in the basement before starting the injection. Open windows, use fans, or even consider using exhaust fans to remove the fumes and maintain a safe working environment.
- Prepare the work area: Before injecting epoxy into the crack, clean the area thoroughly. Remove any loose concrete, dust, or debris from the crack using a wire brush or a vacuum cleaner. This will ensure proper adhesion of the epoxy and improve the effectiveness of the repair.
- Mix the epoxy properly: Prepare the epoxy according to the manufacturer's instructions. Use a clean container and mix the epoxy components thoroughly using a stir stick or an electric mixer. It is important to achieve a homogeneous mixture to ensure the desired bonding strength.
- Use injection ports and caps: Injection ports are small plastic tubes that are inserted into the crack to allow the epoxy to be injected. Place the injection ports along the length of the crack, spaced approximately 6-8 inches apart. Once the epoxy injection is complete, seal the ports with caps to prevent any epoxy leakage.
- Inject the epoxy slowly and evenly: Use a high-pressure injection pump or a caulking gun to inject the epoxy into the crack. Start at the lowest injection port and work your way up. Apply steady pressure to ensure the epoxy fills the crack completely. Avoid injecting too much epoxy at once, as it may cause the crack to overflow or the epoxy to cure unevenly.
- Allow the epoxy to cure: After completing the epoxy injection, allow the epoxy to cure according to the manufacturer's instructions. This typically involves a waiting period of 24-48 hours. During this time, avoid any activities that may disturb the epoxy, such as heavy traffic or placing objects against the repaired area.
By following these safety precautions, you can ensure a safe and effective epoxy injection process for repairing cracks in your basement walls. It is important to note that if you are not experienced in epoxy injection or if the cracks are extensive, it may be best to consult a professional for the repair to ensure optimal results and safety. Always prioritize your safety and that of others when working with epoxy or any other potentially hazardous materials.
Are Underground Downspouts Causing Basement Leaks?
You may want to see also
![]()
How long does it typically take for the epoxy to cure after injecting it into a basement wall?
Epoxy injection is a common method used to repair cracks in basement walls. When cracks develop in the foundation of a building, they can lead to water leakage, structural damage, and other issues. Epoxy injection is an effective way to fill and seal these cracks, preventing further damage and providing a long-lasting solution. However, one question that often arises is how long it takes for the epoxy to cure after it has been injected into the wall.
The curing time of epoxy depends on various factors, such as the type of epoxy used, the temperature and humidity of the environment, and the size of the crack being repaired. Generally, epoxy can take anywhere from a few hours to several days to cure completely. While it may seem like a long time, it is crucial to allow the epoxy sufficient time to cure properly to ensure a durable and effective repair.
The curing process of epoxy involves a chemical reaction between the resin and hardener, which results in a strong and rigid bond. This reaction can be affected by external conditions, such as temperature and humidity. Higher temperatures generally accelerate the curing process, while lower temperatures can slow it down. It is important to ensure that the temperature is within the recommended range specified by the epoxy manufacturer to achieve optimal results.
In addition to temperature, humidity can also affect the curing time of epoxy. High humidity levels can prolong the curing process, as moisture in the air can interfere with the reaction. It is advisable to control the humidity in the area where the epoxy is being applied by using dehumidifiers or other moisture control methods. This will help to create a favorable environment for the epoxy to cure efficiently.
The size of the crack being repaired can also impact the curing time of epoxy. Smaller cracks generally cure faster than larger ones, as the epoxy has a shorter distance to travel and less mass to solidify. It is recommended to apply epoxy in thin layers for larger cracks, allowing each layer to cure before applying the next one. This will ensure that the epoxy cures uniformly and effectively.
To determine if the epoxy has cured completely, it is best to follow the manufacturer's instructions and guidelines. These instructions will typically provide a specific curing time range based on the type of epoxy being used. It is important to note that although the epoxy may feel dry to the touch after the initial curing period, it may still require additional time to fully cure and reach its maximum strength.
In conclusion, the curing time of epoxy injected into a basement wall can vary depending on several factors. The type of epoxy, temperature, humidity, and size of the crack all play a role in determining the curing time. It is important to follow the manufacturer's instructions and allow the epoxy sufficient time to cure properly for a durable and effective repair. By doing so, homeowners can ensure that their basement walls are structurally sound and protected from water damage for years to come.
Creating a Solid Foundation: A Step-by-Step Guide to Building Walls in Your Basement
You may want to see also
![]()
Are there any specific techniques or tips for ensuring proper penetration of the epoxy into the basement wall?

In order to ensure proper penetration of epoxy into a basement wall, there are specific techniques and tips that can be followed. Proper penetration is crucial for a successful basement wall repair or waterproofing project. Here are some effective steps to achieve optimal penetration:
Step 1: Clean the surface
Before applying epoxy, the basement wall must be thoroughly cleaned to remove any dirt, dust, grease, or loose debris. Use a wire brush, scraper, or pressure washer to clean the surface. Clean any cracks or crevices to ensure there are no barriers to proper epoxy penetration.
Step 2: Repair cracks and holes
Inspect the wall for any cracks or holes and repair them prior to applying epoxy. Use a suitable filler material to seal the cracks and level the surface. This will help to prevent water infiltration and ensure a smooth epoxy application.
Step 3: Choose the right epoxy
Select an epoxy specifically designed for basement wall repair or waterproofing. There are different types of epoxies available on the market. Choose an epoxy that is suitable for your specific application and meets the requirements for proper penetration.
Step 4: Mix the epoxy properly
Follow the manufacturer's instructions to mix the epoxy resin and hardener together. Ensure that the epoxy is thoroughly mixed to achieve a consistent and homogenous mixture. Use a clean container and stir the epoxy in a slow and deliberate motion to minimize the introduction of air bubbles.
Step 5: Apply the epoxy
Start by applying a thin coat of epoxy to the basement wall using a brush or roller. This will act as a primer coat and help to improve adhesion and penetration. Allow the primer coat to dry according to the manufacturer's instructions.
Once the primer coat is dry, apply a second coat of epoxy using a trowel or putty knife. Work the epoxy into the surface, making sure it fills any cracks or crevices. Apply the epoxy in a smooth and even manner, ensuring complete coverage of the wall.
Step 6: Use a penetrating sealer
After applying the epoxy, consider using a penetrating sealer to enhance the waterproofing properties and further promote the penetration of the epoxy into the basement wall. The sealer will help to create a barrier against water intrusion and improve the longevity of the epoxy coating.
Step 7: Allow proper curing time
Allow the epoxy to cure and dry fully before subjecting it to any stress or moisture. Follow the manufacturer's instructions for the recommended curing time. Proper curing will ensure that the epoxy has penetrated and bonded with the basement wall, providing a durable and waterproof barrier.
In conclusion, proper penetration of epoxy into a basement wall is essential for achieving effective repair and waterproofing. By following these steps and using the right materials, you can ensure that the epoxy penetrates the wall, fills any cracks, and provides a long-lasting solution for your basement wall issues.
Fixing a Wet Basement: Effective Solutions for a Dry and Healthy Home
You may want to see also
Frequently asked questions
Before injecting epoxy into a basement wall, it is important to prepare the surface properly. Start by cleaning the area with a wire brush or scraper to remove loose debris, dirt, and any existing paint or coatings. Next, use a high-pressure washer to thoroughly clean the wall and remove any remaining dirt or contaminants. Allow the wall to dry completely before proceeding with the epoxy injection.
To inject epoxy into a basement wall, you will need a few essential tools and materials. First, you will need an epoxy injection kit, which typically includes an epoxy resin, a catalyst, and an injection gun. You will also need an electric drill with the appropriate size and type of drill bits for creating injection holes in the wall. Other necessary items include injection ports, surface sealers or crack paste, and a scraper or putty knife for preparing the wall surface. Additionally, make sure to have gloves, safety glasses, and protective clothing to ensure your safety throughout the process.
When injecting epoxy into a basement wall, it is crucial to follow the manufacturer's instructions provided with the epoxy injection kit. Generally, the process involves drilling injection holes along the length of the crack or damaged area and inserting injection ports into these holes. Next, apply surface sealer or crack paste over the crack to prevent the epoxy from leaking out. Mix the epoxy resin and catalyst according to the manufacturer's instructions, and then load it into the injection gun. Begin injecting the epoxy into the lowest injection port, allowing it to fill the crack or void as you work your way up. Continue injecting until the epoxy fills the entire crack or damaged area. Remove the injection ports and allow the epoxy to cure fully before performing any necessary repairs or finishing touches.


