Installing can lights in a bathroom can instantly transform the space, creating a warm and inviting atmosphere. The addition of these recessed lights not only improves the overall brightness of the room, but also adds a touch of elegance and modernity. If you're looking to upgrade your bathroom's lighting and elevate its aesthetic, read on to discover a step-by-step guide on how to install can lights in this often-used and cherished space.
| Characteristics | Values |
|---|---|
| Location of can lights | Above the vanity or mirror |
| Number of can lights | Usually 2 or 3, depending on the size of the bathroom |
| Size of can lights | 4-inch, 5-inch, or 6-inch diameter |
| Type of can lights | Recessed lights or downlights |
| Trim style of can lights | Baffle trim, adjustable trim, or decorative trim |
| Bulb type | LED bulbs are recommended for energy efficiency and long lifespan |
| Placement of can lights | Spaced evenly and symmetrically to ensure even lighting |
| Wiring method | Hardwired to the electrical system or connected to a wall switch |
| Dimmable option | Some can lights can be dimmed for customizable lighting levels |
| Waterproof rating | For shower areas, can lights should have a waterproof or wet rating |
| Fire safety rating | Can lights should be IC-rated for direct contact with insulation |
What You'll Learn
- What tools do I need to install can lights in a bathroom?
- What type and size of can lights should I choose for a bathroom?
- How do I determine the best placement for can lights in a bathroom?
- What are the steps to safely and properly install can lights in a bathroom?
- Are there any particular electrical considerations or safety precautions I should be aware of when installing can lights in a bathroom?
![]()
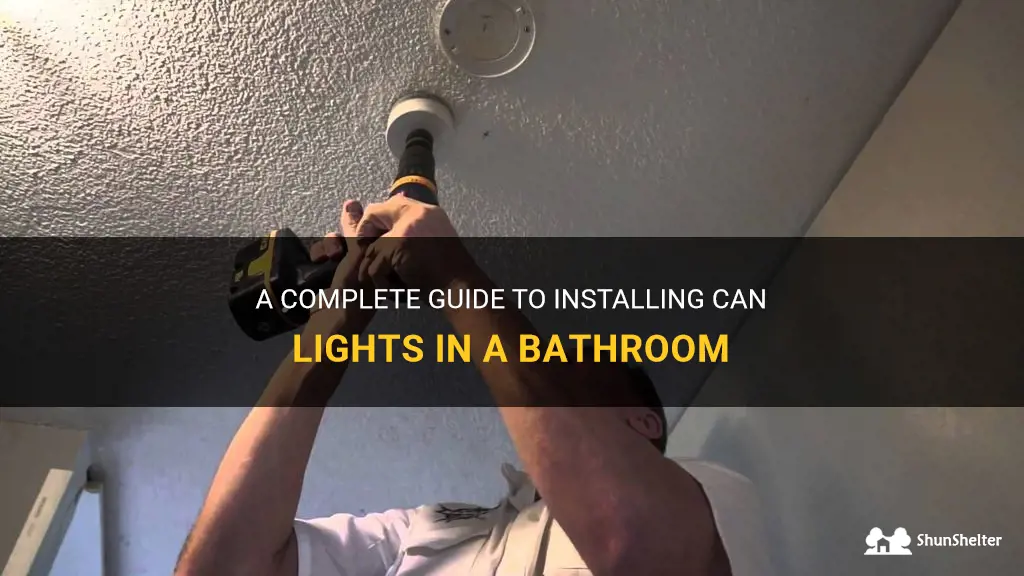
What tools do I need to install can lights in a bathroom?
Installing can lights in a bathroom can be a great way to enhance the overall look and functionality of the space. Whether you are looking to add task lighting for your vanity or accent lighting to create a soothing ambiance, can lights can help achieve the desired effect. To successfully install can lights in a bathroom, you will need a few essential tools. This article will guide you through the process and provide a detailed list of the tools you will need.
Before you begin the installation process, it is important to ensure you have the proper tools to complete the job. Here is a list of tools you will need for installing can lights in a bathroom:
- Drill: A drill is necessary for creating holes in the ceiling to mount the can lights. Make sure you have a drill with a suitable drill bit for the type of material your ceiling is made of.
- Measuring Tape: Accurate measurements are crucial when installing can lights. A measuring tape will help you determine the proper spacing between the lights and ensure they are evenly placed.
- Wire Strippers: When connecting the wiring for the can lights, you will need to strip the insulation off the wires. Wire strippers are a handy tool for this task, allowing you to remove the appropriate amount of insulation without damaging the wire.
- Screwdriver: A screwdriver will be used to secure the can lights to the ceiling and any additional hardware required for installation. Make sure you have the appropriate screwdriver type (Phillips or flathead) for the screws you will be using.
- Wire Connectors: Wire connectors are essential for joining the wires together securely. These connectors come in various sizes and types, so make sure you have the appropriate ones for your specific installation.
- Wire Nuts: Wire nuts are used to cap the exposed wire ends and ensure a safe and secure electrical connection. It is important to choose wire nuts that are appropriate for the gauge of wire you are working with.
- Fish Tape: If you need to run wires through walls or ceilings, a fish tape can be a useful tool. It allows you to navigate through tight spaces and pull the wires to the desired location.
- Ladder or Step Stool: Depending on the height of your ceiling, you may need a ladder or step stool to reach the installation area safely. Ensure your ladder is sturdy and positioned on a level surface before using it.
- Non-contact Voltage Tester: Before starting any electrical work, it is crucial to check for the presence of voltage. A non-contact voltage tester can help you identify live wires without making direct contact, minimizing the risk of electrical shock.
- Safety Equipment: Always prioritize safety when working with electricity. Make sure you have safety goggles, gloves, and a dust mask to protect yourself from any potential hazards.
By having the above tools ready, you will be well-prepared for installing can lights in your bathroom. Remember to read the instructions provided by the manufacturer carefully and follow proper safety guidelines throughout the installation process. If you are unsure about any aspect of the installation, it is recommended to consult a professional electrician to ensure the job is done safely and correctly.
In conclusion, installing can lights in a bathroom can be a rewarding project that adds both style and functionality to the space. With the right tools and proper preparation, you can successfully install can lights and create the desired lighting effect for your bathroom.
How to Lighten Bathroom Tiles: Tips and Tricks
You may want to see also
![]()
What type and size of can lights should I choose for a bathroom?
When it comes to lighting your bathroom, it's important to choose the right type and size of can lights to create the desired ambiance and functionality. Can lights, also known as recessed lights, are a popular choice for bathrooms as they provide a clean and modern look while offering sufficient illumination. In this article, we will discuss the different types and sizes of can lights that are suitable for bathroom lighting.
Type of Can Lights:
There are several types of can lights available, including incandescent, compact fluorescent (CFL), and LED. Each type offers its own unique benefits and considerations.
- Incandescent: These are the traditional type of can lights that use a filament to produce light. They are inexpensive but tend to be less energy-efficient and have a shorter lifespan compared to CFL and LED lights.
- CFL: Compact fluorescent lights are more energy-efficient than incandescent lights and have a longer lifespan. However, they take a few seconds to warm up and reach full brightness, which may not be ideal for bathroom lighting.
- LED: LED lights are the most energy-efficient option and have a significantly longer lifespan compared to incandescent and CFL lights. They are instant-on and provide consistent, high-quality light. While LED lights may have a higher upfront cost, they are more cost-effective in the long run due to energy savings and reduced maintenance.
Size of Can Lights:
The size of can lights is typically measured in inches and refers to the diameter of the fixture. The most common sizes for bathroom lighting are 4-inch and 6-inch can lights.
- 4-inch Can Lights: These smaller-sized can lights are ideal for bathrooms with limited ceiling space or for targeted lighting, such as over a vanity mirror. They provide a more focused and concentrated beam of light, which can highlight specific areas or objects in the bathroom.
- 6-inch Can Lights: These larger-sized can lights are suitable for bathrooms with higher ceilings or require broader and more general illumination. They provide a wider spread of light, making them perfect for illuminating larger areas of the bathroom.
In addition to the type and size of can lights, it's also essential to consider the number and arrangement of lights in your bathroom. The layout and design of your bathroom will dictate the placement of the lights to ensure even and adequate lighting throughout the space. For example, placing multiple 4-inch can lights in a row above a vanity mirror can create a visually appealing and well-lit grooming area.
In summary, choosing the right type and size of can lights for your bathroom can greatly impact the overall lighting design and functionality. Consider the type of light source, such as incandescent, CFL, or LED, based on energy efficiency and lifespan. Additionally, determine the size of the can lights, with 4-inch options for targeted lighting and 6-inch options for more general illumination. By carefully selecting the appropriate can lights for your bathroom, you can create a well-lit and visually appealing space.
Adding Sophistication to Your Bathroom: Can You Install Plantation Shutters?
You may want to see also
![]()
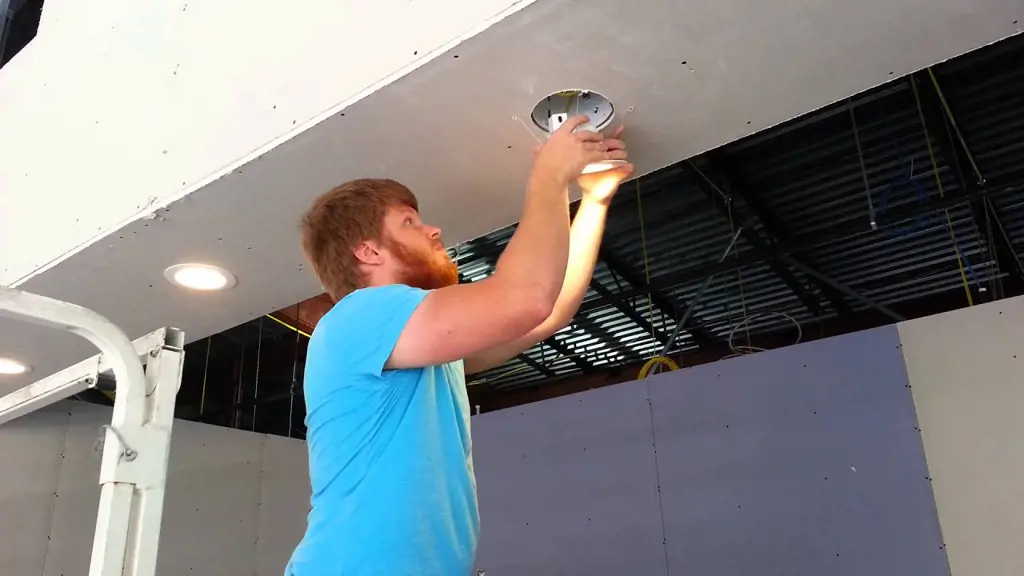
How do I determine the best placement for can lights in a bathroom?
Can lights, also known as recessed lights, are a popular lighting choice for bathrooms. They provide a sleek and modern look while also offering ample illumination. However, determining the best placement for can lights in a bathroom can be a bit tricky. In this article, we will explore the factors to consider and provide a step-by-step approach to help you determine the optimal placement for can lights in your bathroom.
Assess the overall layout of the bathroom:
- Take into account the size and shape of the bathroom. A larger bathroom may require more can lights for proper illumination, while a smaller bathroom may only need a few.
- Consider the locations of other light sources, such as windows or vanity lights. You want to ensure that the can lights complement these existing light sources rather than compete with them.
Determine the purpose of the can lights:
- Are you looking for general ambient lighting or task lighting? This will influence the placement of the can lights.
- General ambient lighting is used to create overall illumination in the bathroom, while task lighting is focused on specific areas such as the vanity or shower.
- If you are aiming for general ambient lighting, evenly spaced can lights throughout the ceiling may be appropriate. If you want task lighting, you may need to concentrate the can lights in the areas where you need the most illumination.
Consider the height of the ceiling:
- The height of the ceiling will impact the placement of the can lights. Higher ceilings may require lights to be placed farther apart to ensure even illumination, while lower ceilings may need lights to be closer together.
- As a general rule, for an 8-foot ceiling, the can lights should be placed about 4 feet apart. For a 9-foot ceiling, they should be placed about 4.5 feet apart. Adjust these distances accordingly based on the size of your bathroom and the desired level of illumination.
Take into account the fixtures and features in the bathroom:
- Consider the positioning of fixtures such as the bathtub, shower, and vanity. These areas may require additional can lights to ensure sufficient task lighting.
- Features such as mirrors and artwork can benefit from accent lighting provided by can lights. Place them strategically to highlight these elements and create a focal point in the bathroom.
Experiment with different placements:
- Before finalizing the placement of the can lights, it is a good idea to experiment with different configurations. Use tape or temporary fixtures to test the placement and see how it affects the overall lighting in the bathroom.
- Pay attention to any shadows or dark spots that may be created by the can lights. Adjust the placement accordingly to eliminate these issues.
In conclusion, determining the best placement for can lights in a bathroom requires careful consideration of factors such as the overall layout, purpose of the lights, ceiling height, and existing fixtures. By following a step-by-step approach and experimenting with different placements, you can achieve optimal lighting in your bathroom. Remember to consult a professional electrician if you are unsure about the electrical work involved in installing can lights.
Can You Use Brad Nails for Beadboard in a Bathroom? The Pros and Cons
You may want to see also
![]()
What are the steps to safely and properly install can lights in a bathroom?
Can lights, also known as recessed lighting, can add a sleek and modern touch to any bathroom. They provide even and focused light without the need for bulky fixtures. However, installing can lights requires careful planning and precision to ensure safety and proper functionality. In this article, we will discuss the steps to safely and properly install can lights in a bathroom.
- Plan the Layout: Before starting the installation process, it's important to carefully plan the layout of the can lights. Consider the size of the bathroom, ceiling height, and desired placement of the lights. It's recommended to have at least one can light for every 25 square feet of bathroom space.
- Turn off the Power: Safety should always be the top priority when working with electricity. Begin by turning off the power to the bathroom at the main circuit breaker. Use a voltage tester to double-check that the power is indeed off.
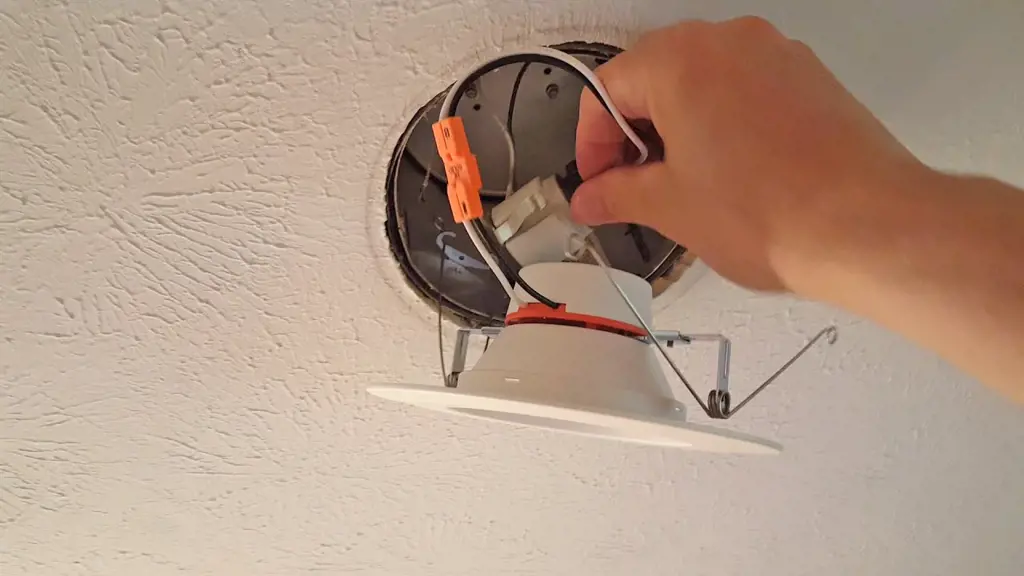
- Cut the Holes: Once the power is off, mark the desired locations of the can lights on the ceiling. Use a hole saw or jab saw to carefully cut holes according to the manufacturer's specifications. Be cautious not to damage any electrical wiring or structural components within the ceiling.
- Install the Electrical Boxes: After cutting the holes, it's time to install the electrical boxes. These boxes will house the wiring and provide a secure connection for the can lights. Follow the manufacturer's instructions for specific installation details. Make sure the electrical boxes align properly with the holes.
- Run the Wiring: Next, run the electrical wiring from the main electrical panel to each of the can light locations. This may require fishing the wires through the ceiling or using wiremold to conceal them. It's essential to follow local building codes and regulations when installing the wiring.
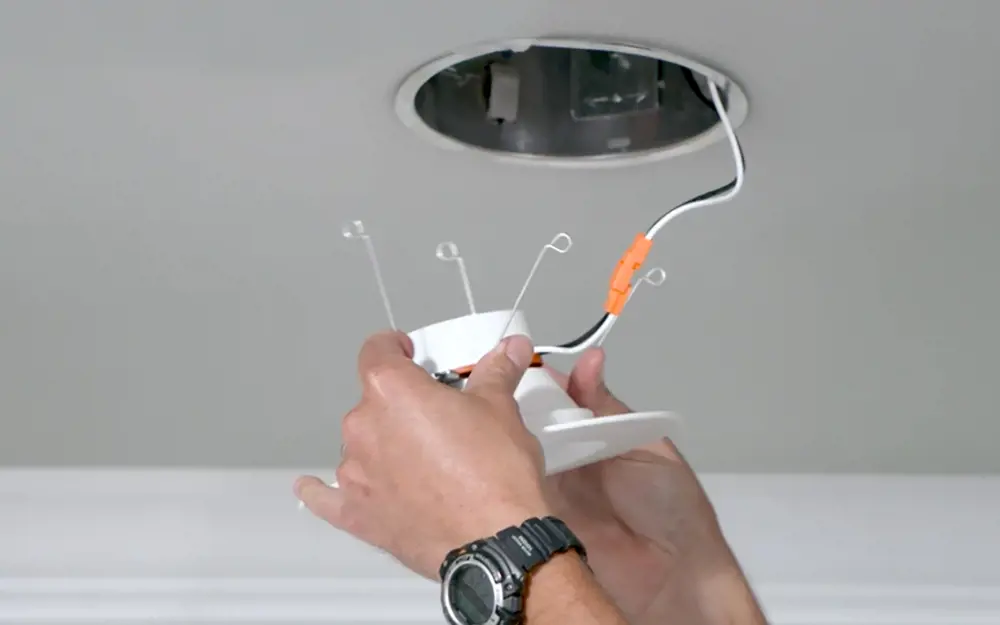
- Connect the Wiring: Once the wiring is in place, connect the wires from the electrical circuit to the wiring of each can light. This step requires knowledge of electrical connections, so if you're not comfortable, it's best to hire a licensed electrician. Ensure all connections are securely tightened and that the correct wires are paired.
- Install the Can Lights: With the wiring in place, it's time to install the can lights. Carefully insert each light into its corresponding hole, ensuring a snug fit. Follow the manufacturer's instructions for securing the can lights to the electrical boxes. Be mindful of any trim or insulation that may need to be installed around the lights.
- Finish the Installation: Once all the can lights are securely in place, you can finish the installation by attaching the trim and bulbs. Choose trim that complements the style of your bathroom and install according to the manufacturer's instructions. Finally, insert the appropriate bulbs into each can light.
- Test the Lights: Before completing the project, turn the power back on and test the can lights to ensure they are functioning properly. Adjust the trim as needed to achieve the desired lighting effect.
In conclusion, installing can lights in a bathroom can be a rewarding DIY project if done safely and properly. However, it's important to have knowledge of electrical wiring and to adhere to local building codes and regulations. If you're unsure or uncomfortable with any step of the process, it's always best to consult a licensed electrician. With careful planning and execution, can lights can transform your bathroom into a well-lit and stylish space.
Exploring the Use of Oracal in Your Bathroom: A Stylish and Durable Option
You may want to see also
![]()
Are there any particular electrical considerations or safety precautions I should be aware of when installing can lights in a bathroom?
Can lights, also known as recessed lights, are a popular choice for bathrooms as they provide a sleek and modern look. However, before installing can lights in a bathroom, there are certain electrical considerations and safety precautions that should be taken into account.
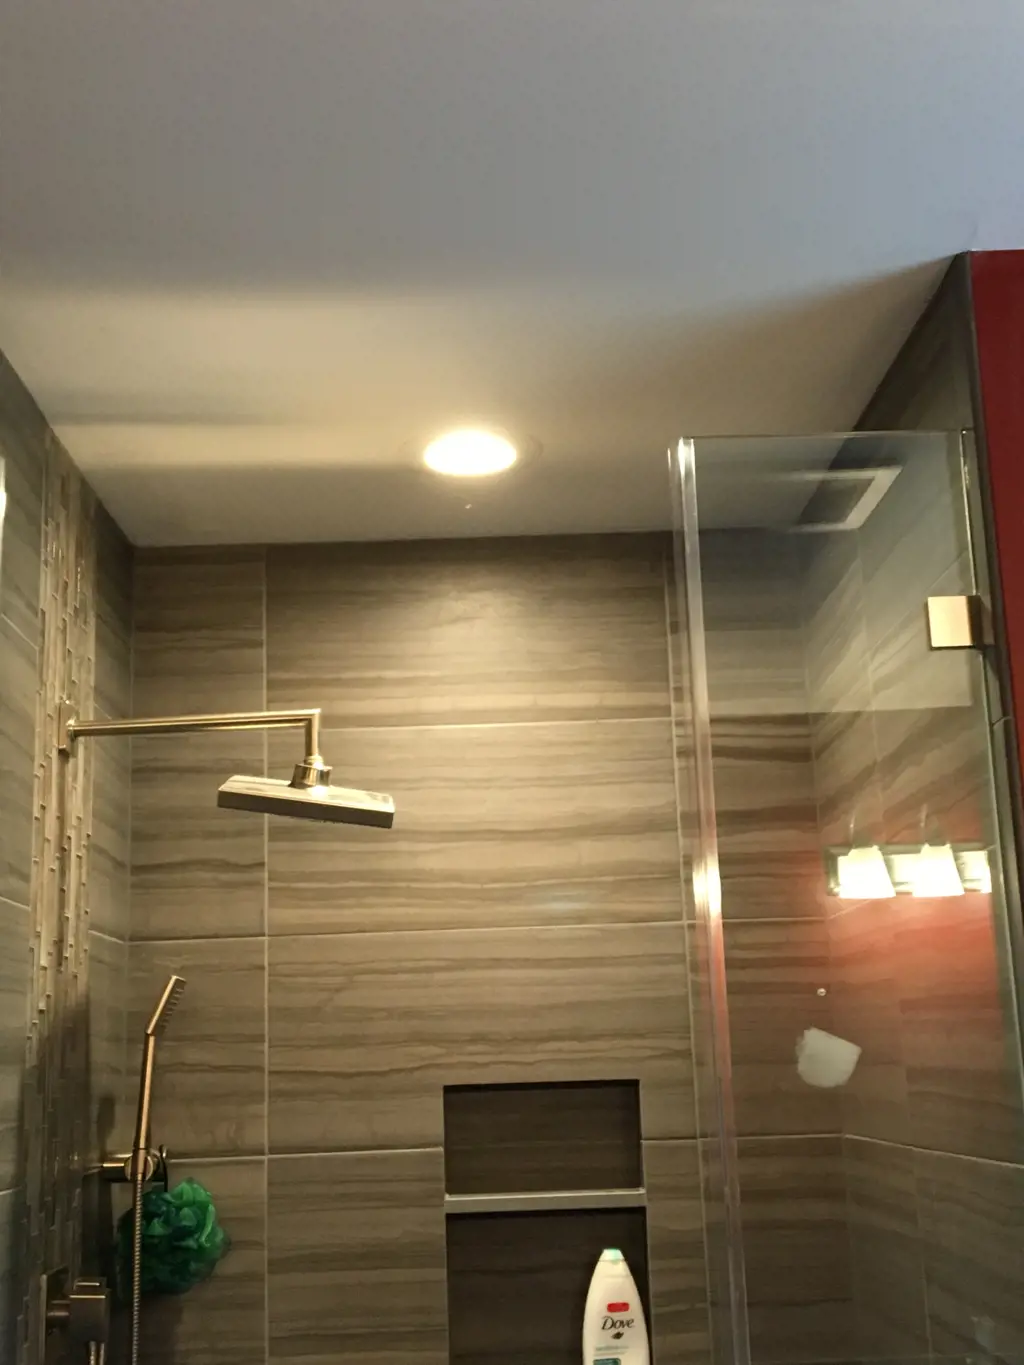
One of the most important things to consider when installing can lights in a bathroom is the location of the lights. It is crucial to ensure that the lights are placed a safe distance away from water sources, such as the shower, bathtub, or sink. This is to prevent any potential electrical hazards that could occur if water were to come into contact with the lights.
Additionally, it is important to choose can lights that are rated for use in damp or wet locations. These lights are specifically designed to withstand exposure to moisture and are equipped with special features, such as gaskets and sealed lenses, to prevent water from seeping into the electrical components.
Furthermore, it is essential to ensure that the wiring for the can lights is installed correctly. This is where hiring a licensed electrician can be beneficial, as they will have the knowledge and expertise to safely wire the lights. The wiring should be properly grounded and the circuit should be protected by a Ground Fault Circuit Interrupter (GFCI), which will quickly shut off the power in the event of a ground fault.
When installing can lights in a bathroom, it is also important to use the correct type of insulation. Since bathrooms are typically insulated to prevent moisture buildup, it is crucial to use insulation that is rated for use in wet or damp locations. Using the wrong type of insulation can create a fire hazard or result in moisture damage to the lights.
Furthermore, it is advisable to use LED bulbs in can lights in a bathroom. LED bulbs are energy-efficient and generate less heat than traditional incandescent bulbs, reducing the risk of overheating. They also have a longer lifespan, making them a cost-effective choice in the long run.
Overall, when installing can lights in a bathroom, it is important to consider the electrical safety precautions and to follow the proper installation guidelines. This includes selecting the appropriate can lights for damp or wet locations, ensuring proper wiring and grounding, using the correct insulation, and using LED bulbs. By taking these precautions, you can enjoy the benefits of can lights in your bathroom while keeping your home safe.
Decorating Your Bathroom Walls: Can You Use Slate for a Stylish Look?
You may want to see also
Frequently asked questions
To install can lights in your bathroom, you will need to first choose the right location for the lights. Make sure to consider the spacing and placement for optimal lighting. Next, you will need to cut a hole in the ceiling for each can light using a hole saw. Once the holes are cut, you can run the wiring through the ceiling and connect it to the electrical panel. After that, you can mount the can lights into the holes and secure them in place. Finally, you will need to connect the light fixtures to the wiring and attach any trim or bulbs.
To install can lights in your bathroom, you will need a few tools and materials. Some of the essential tools include a drill, hole saw, wire strippers, wire nuts, and a screwdriver. You may also need a stud finder, ladder, and a voltage tester. In terms of materials, you will need the can light fixtures, electrical wiring, electrical boxes, and any necessary trim or bulbs.
Yes, you can install can lights in a bathroom with a sloped ceiling. However, the installation process may be slightly different compared to a flat ceiling. You will need to use special sloped-ceiling housing for the can lights. These housing units are designed to allow for proper installation on sloped surfaces. Additionally, make sure to choose adjustable trim that can accommodate the angle of the ceiling. It may be helpful to consult a professional electrician or contractor if you are unsure about installing can lights on a sloped ceiling.