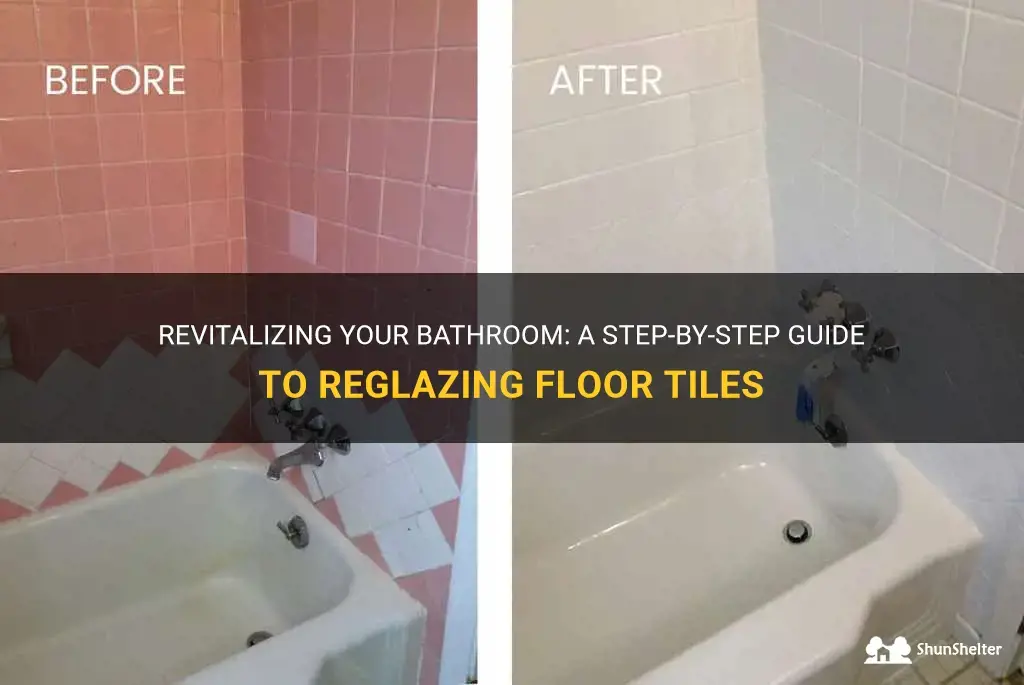
Are your bathroom floor tiles looking worn and outdated? Are you tired of the dull and stained appearance? If so, reglazing your bathroom floor tiles might be the solution you've been searching for. Reglazing is a cost-effective and efficient way to restore the beauty and functionality of your tiles without the hassle and expense of replacing them entirely. In this article, we will explore the benefits of reglazing bathroom floor tiles and provide you with a step-by-step guide on how to successfully reglaze your tiles to achieve stunning results. Get ready to transform your bathroom with a fresh new look!
| Characteristics | Values |
|---|---|
| Material | Epoxy/Tile Paint |
| Color options | Various |
| Durability | Long-lasting |
| Waterproof | Yes |
| Chemical resistance | Yes |
| Stain resistance | Yes |
| Odor | Minimal |
| Cost | Affordable |
| Installation time | Short |
| Maintenance | Easy |
| Cleaning | Simple |
| Curing time | Quick |
| DIY-friendly | Yes |
| Appearance improvement | Yes |
| Surface preparation required | Yes |
| Application method | Paint roller or brush |
| Coverage | Depends on tile size |
What You'll Learn
- What supplies and tools are needed to reglaze bathroom floor tiles?
- What steps should be followed to prepare the tiles for reglazing?
- How do you apply the reglazing product to the bathroom floor tiles?
- How long does the reglazing process typically take to complete?
- Are there any special precautions or maintenance steps to take after reglazing bathroom floor tiles?
![]()
What supplies and tools are needed to reglaze bathroom floor tiles?
Reglazing bathroom floor tiles is a cost-effective way to breathe new life into your worn-out tiles without the need for a complete renovation. Reglazing not only transforms the look of your bathroom, but it also adds a layer of protection to prolong the life of your tiles. However, before you embark on this DIY project, it's important to gather all the necessary supplies and tools to ensure a successful and smooth reglazing process.
Cleaning supplies:
- Tile and Grout cleaner: Use a heavy-duty cleaner specifically designed for removing stains and dirt from tiles and grout. Make sure to choose a cleaner that is compatible with the type of tiles you have.
- Scrub brush: A stiff-bristle brush is essential for scrubbing away stubborn grime and dirt from the tiles and grout.
- Rags or sponges: These will help to wipe away the cleaner and any leftover residue.
Surface Preparation supplies:
- Sandpaper: Depending on the condition of your tiles, you may need coarse (80-120 grit) or fine (220-320 grit) sandpaper. Use the coarse grit to remove any loose, peeling, or chipped glaze from the tiles. The fine grit sandpaper is used to smooth the surface and create a suitable substrate for the reglazing.
- Putty knife: Use a putty knife to scrape off any excess adhesive, caulk, or grout that may be present on the tiles. This will ensure a smooth and even surface for reglazing.
- Masking tape: Apply masking tape around edges, fixtures, and areas you want to protect from accidental overspray or drips.
Reglazing supplies:
- Epoxy or acrylic-based tile reglazing kit: Choose a high-quality reglazing kit that is specially formulated for use on bathroom tiles. The kit should contain all the necessary components, including a primer, base coat, and topcoat. Follow the instructions provided in the kit for proper mixing and application.
- Paint sprayer or roller: Depending on the type of reglazing kit you choose, you will need a paint sprayer or roller to apply the reglazing solution to the tiles. A sprayer will provide a more even and smooth finish, while a roller is easier to control for smaller areas.
- Respirator mask and gloves: It's important to protect yourself from the fumes and chemicals emitted during the reglazing process. Wear a respirator mask and gloves to ensure your safety.
Drying and curing supplies:
- Fans or ventilation: Proper ventilation is crucial during the drying and curing process to ensure adequate airflow and evaporation of chemicals.
- Drying time: Follow the instructions provided in the reglazing kit for the recommended drying time. It usually takes around 24-48 hours for the reglazing to fully cure and harden.
- Cautions: Avoid using the bathroom until the reglazing is fully cured to prevent any damage or premature wear.
To successfully reglaze your bathroom floor tiles, it's important to thoroughly clean and prepare the surface before applying the reglazing solution. Follow the step-by-step instructions provided in the reglazing kit for best results. Remember to take necessary safety precautions and wear protective gear when handling the chemicals involved in the reglazing process. With the right supplies and tools, reglazing your bathroom floor tiles can bring new life to your space and save you the cost of replacing the tiles.
The Importance of Screeding a Bathroom Floor for a Smooth and Durable Finish
You may want to see also
![]()
What steps should be followed to prepare the tiles for reglazing?
When it comes to reglazing tiles, proper preparation is key to ensuring a successful and long-lasting finish. Taking the time to properly clean and prepare your tiles before reglazing will help to ensure a smooth and even application of the new finish. Here are the steps that should be followed to prepare your tiles for reglazing:
- Clean the tiles: Before reglazing, it's important to thoroughly clean the tiles to remove any dirt, grease, or other contaminants. Use a mild detergent and warm water to scrub the tiles, and rinse them well to remove any soapy residue. In some cases, you may need to use a degreaser or tile cleaner to remove stubborn stains or grease buildup.
- Repair any damaged tiles: If there are any cracked or chipped tiles, it is important to repair them before reglazing. Fill any cracks or chips with a tile repair compound or epoxy, and make sure to smooth out the surface to create an even and level finish. Allow the repairs to fully cure before moving on to the next step.
- Sand the tiles: Once the tiles are clean and any repairs have been made, it's time to sand the surface to create a rough texture that will help the reglazing material adhere properly. Use a medium-grit sandpaper or a sanding block to gently rough up the surface of the tiles. Be careful not to be too aggressive, as this can damage the tiles. After sanding, wipe away any dust with a damp cloth.
- Mask off any adjacent areas: Before applying the reglazing material, it's important to protect any adjacent areas that you don't want to get the reglazing material on. Use painter's tape to mask off the edges of the tiles as well as any fixtures or surfaces that you want to protect from overspray or drips.
- Apply a bonding primer: To further enhance the adhesion of the reglazing material, it's recommended to apply a bonding primer to the tiles. This will help the reglazing material to adhere better and provide a longer-lasting finish. Follow the manufacturer's instructions for the primer and allow it to fully dry before proceeding.
- Apply the reglazing material: Once the tiles are prepped and the primer is dry, it's time to apply the reglazing material. This can be done using a brush, roller, or sprayer depending on the specific product and your personal preference. Follow the manufacturer's instructions for application techniques and drying times.
- Allow for proper curing: After applying the reglazing material, it is important to allow for proper curing before using the tiles. Follow the manufacturer's recommended drying and curing times, and make sure to avoid any excessive moisture or heavy use during this time.
By following these steps, you can ensure that your tiles are properly prepared for reglazing. Taking the time to clean, repair, sand, prime, and apply the reglazing material correctly will help to ensure a smooth and long-lasting finish that will transform your tiles and give them a fresh new look.
The Ultimate Guide to Achieving Sparkling White Grout in Your Bathroom Floor
You may want to see also
![]()
How do you apply the reglazing product to the bathroom floor tiles?
Reglazing bathroom floor tiles is a great way to breathe new life into an old and worn-out flooring surface. It can give your bathroom a fresh and updated look without the hassle and cost of replacing the tiles. In this article, we will discuss how to apply a reglazing product to bathroom floor tiles step-by-step.
Step 1: Prepare the Surface
Before applying the reglazing product, it is essential to properly prepare the surface. Start by thoroughly cleaning the tiles to remove any dirt, grime, or soap scum. You can use a tile cleaner or a mixture of warm water and mild detergent to clean the tiles. Scrub the surface gently with a soft brush or sponge, paying extra attention to any stains or stubborn dirt.
Step 2: Repair Any Damages
Inspect the tiles for any cracks, chips, or loose areas. If you find any damages, it is crucial to repair them before proceeding with the reglazing process. Use a tile repair kit or epoxy compound to fix any cracks or chips. Replace any loose tiles and ensure the surface is level and smooth.
Step 3: Etch the Surface
Once the tiles are clean and repaired, it is time to etch the surface to create a rough and porous texture for better adhesion of the reglazing product. Most reglazing kits come with an etching solution that you can apply using a brush or sponge. Follow the manufacturer's instructions regarding the application and curing time of the etching solution.
Step 4: Apply the Reglazing Product
Now it's time to apply the reglazing product. Shake the reglazing can or mix the components, following the instructions on the product label. Start applying the reglazing product using a roller brush or sprayer. Work in small sections and apply thin, even coats. It is essential to follow the recommended number of coats mentioned in the product instructions for optimal results.
Step 5: Allow for Curing
After applying the reglazing product, allow it to cure according to the manufacturer's instructions. Typically, you will need to wait for at least 24 hours before using the bathroom again. Make sure the area is well-ventilated during the curing process to prevent the buildup of fumes.
Step 6: Clean and Maintain
Once the reglazing product has cured, clean the bathroom floor tiles regularly with mild detergent and a non-abrasive sponge or cloth. Avoid using harsh chemicals or abrasive scrubbers that could damage the reglazed surface. Regular cleaning and proper maintenance will keep the reglazed tiles looking pristine for years to come.
In conclusion, reglazing bathroom floor tiles can be a cost-effective and convenient way to refresh your bathroom's appearance. By following these step-by-step instructions and using a high-quality reglazing product, you can achieve professional-looking results and enjoy a beautiful bathroom floor for years to come.
The Ultimate Guide to Paneling a Bathroom Wall
You may want to see also
![]()
How long does the reglazing process typically take to complete?
The reglazing process, also known as refinishing or resurfacing, is a method used to restore the surface of a bathtub, sink, or other fixtures. This process involves applying a new coating to the existing surface to give it a fresh and updated look.
The length of time it takes to complete the reglazing process can vary depending on several factors, including the size and condition of the fixture being reglazed and the experience level of the professional performing the work. On average, the reglazing process typically takes between 3 to 5 hours to complete.
The first step in the reglazing process is to thoroughly clean and prepare the surface of the fixture. This involves removing any dirt, grime, or previous coatings that may be present. The surface is then sanded down to create a smooth and even texture, which provides a better bonding surface for the new coating.
Once the surface is prepared, the reglazing professional will carefully apply the new coating to the fixture. This can be done using a spray gun or a brush, depending on the specific product being used. The coating is applied in multiple layers, with each layer needing time to dry before the next one is applied.
After the final layer of coating has been applied, the fixture will need time to cure. The curing process typically takes between 24 to 48 hours, during which time the surface should not be used or exposed to water. This allows the coating to fully harden and bond to the surface, ensuring a long-lasting and durable finish.
It's important to note that while the reglazing process itself may only take a few hours to complete, the overall timeframe for the project can be longer due to the curing and drying times. It's also worth mentioning that the reglazing process may require multiple visits from the professional, depending on the condition of the fixture and the complexity of the job.
In conclusion, the reglazing process typically takes between 3 to 5 hours to complete, with additional time needed for curing and drying. It's important to hire a professional with experience in reglazing to ensure a high-quality and long-lasting finish. With proper care and maintenance, a reglazed fixture can last for many years.
The Ultimate Guide to Installing a Tile Bathroom Shower Floor
You may want to see also
![]()
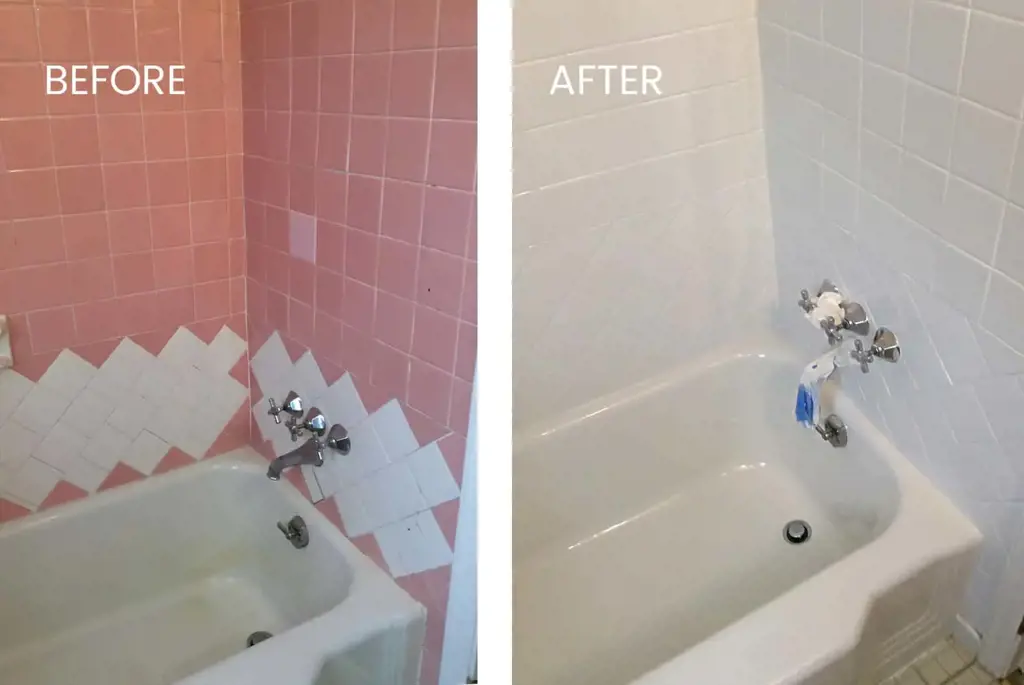
Are there any special precautions or maintenance steps to take after reglazing bathroom floor tiles?
Reglazing bathroom floor tiles is a great way to give your bathroom a fresh, new look without the expense of replacing the tiles. However, after reglazing your bathroom floor tiles, it is important to take some special precautions and to follow certain maintenance steps to ensure that your newly refinished tiles stay looking their best for as long as possible.
Here are some tips to help you maintain and care for your reglazed bathroom floor tiles:
- Avoid using harsh or abrasive cleaners: While your reglazed tiles are durable, they can still be prone to scratches. To prevent any damage, avoid using harsh or abrasive cleaners that can scratch the surface of the tiles. Instead, opt for mild, non-abrasive cleaners that are specifically recommended for use on reglazed surfaces.
- Use a gentle touch when cleaning: When cleaning your reglazed tiles, be sure to use a gentle touch. Avoid scrubbing too vigorously, as this can also scratch the surface. Instead, use a soft sponge or cloth and gently wipe away any dirt or grime.
- Avoid using harsh chemicals: Harsh chemicals, such as bleach or ammonia, can also damage the surface of reglazed tiles. Instead of using these chemicals, opt for safer alternatives, such as vinegar or baking soda mixed with water, to clean your tiles. These natural cleaners are effective at removing stains and grime without causing any damage.
- Avoid using abrasive cleaning tools: In addition to avoiding harsh cleaners, it is important to also avoid using abrasive cleaning tools, such as steel wool or scrub brushes with stiff bristles. These can cause micro-scratches on the surface of the tiles, leading to a dull appearance over time. Instead, use softer cleaning tools, such as a soft-bristle brush or a microfiber cloth, to clean your tiles.
- Avoid dragging heavy objects: While reglazed tiles are durable, they can still be prone to chipping or cracking if heavy objects are dragged across them. To prevent any damage, avoid dragging heavy furniture or appliances across your bathroom floor tiles. Instead, use protective pads or furniture coasters when moving heavy objects to prevent any scratching or damage to the tiles.
- Regularly inspect for any signs of damage: Even with proper care and maintenance, reglazed tiles can sometimes develop chips or cracks over time. It is important to regularly inspect your bathroom floor tiles for any signs of damage, such as chips, cracks, or peeling. If you notice any damage, it is best to address it as soon as possible to prevent further deterioration and to keep your tiles looking their best.
By following these precautions and maintenance steps, you can ensure that your reglazed bathroom floor tiles stay looking their best for years to come. With proper care and maintenance, reglazed tiles can maintain their shine and durability, giving your bathroom a fresh, new look that will last.
Transform Your Dull Bathroom Floor Tiles with These Simple Tricks
You may want to see also
Frequently asked questions
Yes, you can reglaze bathroom floor tiles yourself. However, it is important to note that reglazing is a delicate process that requires careful preparation and application. If you are not experienced or confident in your skills, it may be best to hire a professional to ensure the job is done correctly.
The amount of time it takes to reglaze bathroom floor tiles can vary depending on several factors, such as the size of the bathroom and the condition of the tiles. On average, the process can take anywhere from a few hours to a full day. It is important to allow enough time for the reglazing to fully dry and cure before using the bathroom again.
The durability of reglazed bathroom floor tiles can vary depending on several factors, such as the quality of the materials used and the level of wear and tear the tiles receive. However, when done properly, reglazing can typically last anywhere from 5 to 10 years. It is important to regularly clean and maintain the tiles to ensure they stay in good condition for as long as possible.