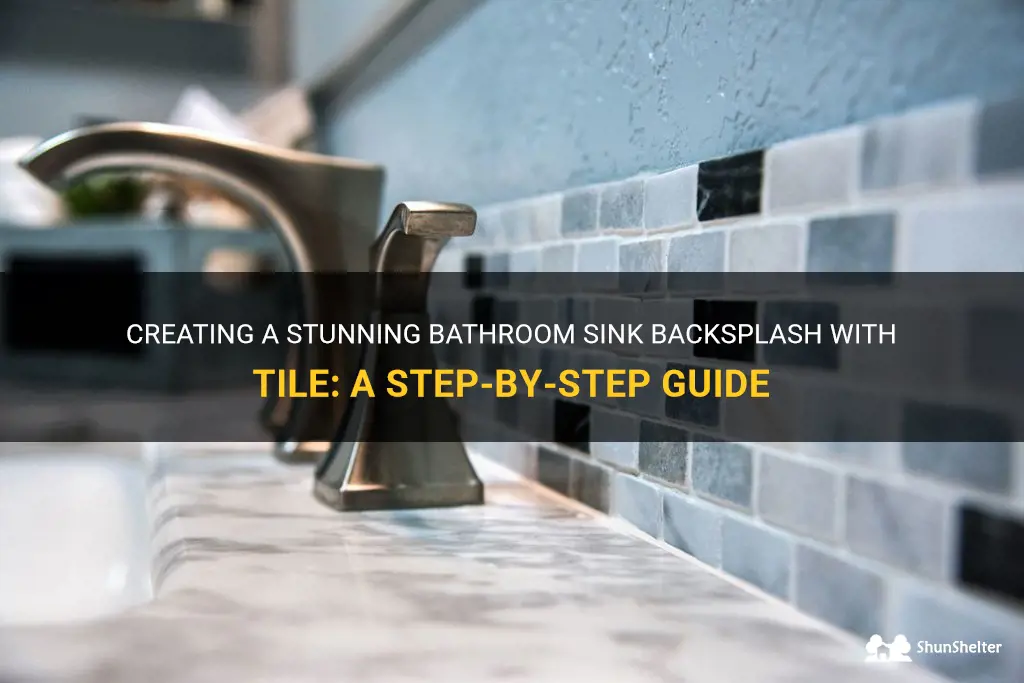
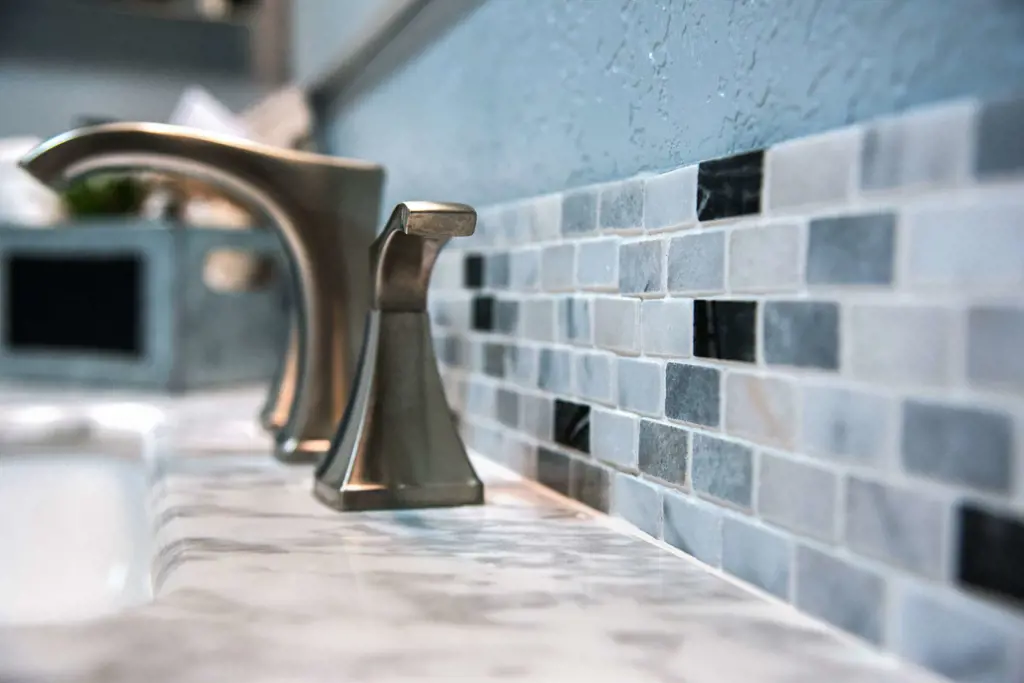
When it comes to bathroom design, the sink area often gets overlooked. However, adding a tile backsplash to your bathroom sink can instantly elevate the look and feel of your entire space. Not only does a tile backsplash protect your walls from water damage, but it also adds a touch of personality and style to your bathroom. Whether you're aiming for a contemporary, classic, or rustic look, tiling your bathroom sink backsplash allows you to get creative and customize your space to your taste. In this guide, we will walk you through the step-by-step process of how to tile your bathroom sink backsplash, so you can transform your bathroom into a stylish and functional oasis.
| Characteristics | Values |
|---|---|
| Material | Ceramic, Porcelain, Glass, Stone |
| Size | Varied sizes available |
| Shape | Square, Rectangular, Subway |
| Color | Varies depending on material |
| Finish | Glossy, Matte, Textured |
| Installation method | Adhesive, Thinset mortar |
| Grout type | Sanded, Unsanded |
| Maintenance | Easy to clean and maintain |
| Durability | Water-resistant, Scratch-resistant |
| Cost | Varies depending on material |
What You'll Learn
- What materials do I need to tile a bathroom sink backsplash?
- How do I prepare the surface for tiling a bathroom sink backsplash?
- What is the best type of tile to use for a bathroom sink backsplash?
- What tools do I need to install a bathroom sink backsplash?
- Are there any specific techniques for cutting and installing tiles around a bathroom sink and faucet?
![]()
What materials do I need to tile a bathroom sink backsplash?
When it comes to tiling a bathroom sink backsplash, it's important to have the right materials on hand to ensure a high-quality and long-lasting result. From adhesives to grouts, here is a list of the materials you will need to complete this project successfully.
- Tiles: Choose tiles that are suitable for wet areas, such as ceramic or porcelain tiles. Consider the size and style of the tiles, keeping in mind the overall aesthetic of your bathroom.
- Tile adhesive: A high-quality tile adhesive is essential for securing the tiles to the wall. Look for a waterproof adhesive that is suitable for use in bathrooms.
- Notched trowel: This tool is used to apply the tile adhesive evenly onto the wall. The notches on the trowel help to create grooves in the adhesive, allowing for better adhesion of the tiles.
- Tile spacers: These small plastic or rubber pieces are used to create uniform gaps between the tiles. They help to ensure that the finished backsplash looks neat and professional.
- Tile cutter or wet saw: You may need to cut some of the tiles to fit around corners or fixtures. A tile cutter or wet saw will help you achieve clean and precise cuts.
- Level and measuring tape: It's important to ensure that your tiles are installed straight and level. A level and measuring tape will help you achieve accurate and straight lines.
- Grout: Choose a grout color that complements your tiles and overall bathroom design. Opt for a waterproof grout to prevent moisture from seeping into the walls.
- Grout float: This tool is used to apply the grout evenly between the tiles. It helps to ensure that the grout fills all the gaps and creates a smooth finish.
- Grout sealer: Once the grout has dried, apply a grout sealer to protect it from stains and mildew. This step will help to prolong the life of your backsplash.
- Sponge and bucket: You will need a sponge and bucket of water to clean the excess grout from the tiles during the installation process.
Now that you have gathered all the necessary materials, follow these step-by-step instructions to tile your bathroom sink backsplash:
- Prepare the wall: Clean the wall thoroughly and ensure it is dry and free of any dirt or debris. Remove any existing tiles or wallpaper if necessary.
- Measure and mark: Use a measuring tape and level to mark the desired height and width of the backsplash. This will help you create an even and symmetrical design.
- Apply the adhesive: Using a notched trowel, spread the tile adhesive onto the wall in small sections. Make sure to create grooves with the notches for better adhesion.
- Install the tiles: Press the tiles firmly into the adhesive, using the tile spacers to create even gaps between the tiles. Work in small sections to ensure the adhesive doesn't dry out.
- Cut and fit the tiles: Use a tile cutter or wet saw to cut the tiles to fit around corners or fixtures. Make sure to wear safety glasses and follow the manufacturer's instructions for your cutting tool.
- Allow the adhesive to dry: Follow the manufacturer's instructions for the drying time of the adhesive. Avoid disturbing the tiles while they are drying to prevent them from shifting.
- Apply the grout: Mix the grout according to the manufacturer's instructions and use a grout float to spread it evenly over the tiles. Remove excess grout with a damp sponge and clean the tiles thoroughly.
- Seal the grout: Once the grout has dried completely, apply a grout sealer to protect it from stains and moisture. Follow the manufacturer's instructions for the application process.
- Clean and enjoy: After sealing the grout, clean the tiles one final time to remove any residue. Step back and admire your newly tiled bathroom sink backsplash!
Remember, tiling a bathroom sink backsplash requires patience and attention to detail. Make sure to follow the manufacturer's instructions for all the materials you use and take your time to achieve a professional-looking result. Happy tiling!
Exploring Bathroom Inclusivity: The Policy on Bathroom Use at Target Stores
You may want to see also
![]()
How do I prepare the surface for tiling a bathroom sink backsplash?
Adding a tile backsplash to your bathroom sink can be a great way to update the look of your space and add a splash of color or texture. However, before you can start tiling, it's important to properly prepare the surface for a successful installation. Here are some steps to follow to ensure a smooth and long-lasting backsplash.
Step 1: Clean the surface
The first step in preparing the surface for tiling is to thoroughly clean it. Remove any dirt, grime, or grease by using a mild detergent or a specialized tile cleaner. It's important to have a clean surface for the tiles to adhere properly. Make sure to rinse the surface well and let it dry completely before moving on to the next step.
Step 2: Repair any damage
Inspect the surface for any cracks, holes, or uneven areas. Use a spackling compound or a similar product to fill in any cracks or holes. If the surface is uneven, you may need to use a leveling compound to create a smooth and even base. Follow the manufacturer's instructions when using these products, and allow sufficient drying time before proceeding.
Step 3: Sand or roughen the surface
To ensure a good bond between the tile and the surface, it's recommended to sand or roughen the surface. This can be done using sandpaper or a sanding block. Gently sand the surface to create a slightly rough texture. This will help the tile adhesive adhere better to the surface.
Step 4: Apply a primer or sealant
Depending on the type of surface you're working with, it may be necessary to apply a primer or a sealant before tiling. This is especially important for porous surfaces, such as drywall or plywood. Applying a primer or sealant will help prevent moisture from seeping into the surface and compromising the installation. Follow the manufacturer's instructions for proper application and drying time.
Step 5: Determine the layout
Before you start tiling, it's important to plan the layout of your backsplash. Measure the area and mark the centerline to ensure that the tiles are installed evenly. Dry-fit the tiles without adhesive to see how they will look and make any necessary adjustments.
Step 6: Apply tile adhesive
Once the surface is prepped and the layout is determined, it's time to apply the tile adhesive. Follow the manufacturer's instructions for mixing and applying the adhesive. Use a notched trowel to spread the adhesive evenly over a small section of the wall. Press the tiles into place, wiggling them slightly to ensure a good bond. Repeat this process until all the tiles are installed.
Step 7: Grout the tiles
After the adhesive has dried, it's time to grout the tiles. Mix the grout according to the manufacturer's instructions and use a grout float to apply it to the spaces between the tiles. Make sure to fill all the gaps completely and smooth the grout lines with the float. Wipe off any excess grout with a damp sponge.
Step 8: Seal the grout
To protect the grout and keep it looking its best, it's recommended to apply a grout sealer. This will help prevent staining and make it easier to clean. Follow the manufacturer's instructions for proper application and drying time.
In conclusion, preparing the surface for tiling a bathroom sink backsplash is an important step to ensure a successful installation. By cleaning the surface, repairing any damage, sanding or roughening the surface, applying a primer or sealant, and properly installing the tiles and grout, you can achieve a beautiful and long-lasting backsplash.
The Timeless Elegance: Incorporating Marble Tile and Beige Bathroom Sink Countertop
You may want to see also
![]()
What is the best type of tile to use for a bathroom sink backsplash?
When it comes to choosing a tile for your bathroom sink backsplash, there are several factors to consider. You want a tile that not only looks great but is also durable and easy to clean. With so many options available, it can be overwhelming to make a decision. However, there are a few types of tiles that are particularly well-suited for bathroom sink backsplashes.
One of the most popular choices for bathroom sink backsplashes is ceramic tile. Ceramic tile is durable, easy to clean, and comes in a wide variety of colors, patterns, and sizes. It is also resistant to water and stains, making it the perfect choice for a bathroom where spills and splashes are common. Additionally, ceramic tile is relatively affordable and easy to install, making it a practical option for homeowners on a budget.
Another great option for bathroom sink backsplashes is glass tile. Glass tile is known for its sleek and modern look, and it can instantly elevate the style of any bathroom. It is available in a wide range of colors and finishes, allowing you to create a truly custom look. Glass tile is also easy to clean and resistant to stains, making it a practical choice for a bathroom setting. However, it is important to note that glass tile can be more expensive than other options.
If you are looking for something a bit more unique, consider using natural stone tile for your bathroom sink backsplash. Natural stone tiles, such as marble, granite, or travertine, offer a timeless and luxurious look. Each piece of natural stone is unique, giving your bathroom a one-of-a-kind appearance. Natural stone tiles are also durable and resistant to water, making them a great choice for a bathroom. However, it is important to note that natural stone tiles require regular sealing to protect them from stains and water damage.
In terms of installation, most types of tiles can be installed using the same basic steps. First, you will need to prepare the surface by cleaning it and ensuring it is smooth and level. Next, you will apply a layer of thinset mortar to the wall using a notched trowel. Then, you will press the tiles into the mortar, starting from the bottom and working your way up. Make sure to use spacers between the tiles to ensure even spacing. Once the tiles are in place, you will need to let the mortar dry for 24-48 hours before grouting. Finally, you will apply grout between the tiles using a grout float, wiping away any excess with a damp sponge.
In conclusion, when choosing a tile for your bathroom sink backsplash, it is important to consider factors such as durability, ease of cleaning, and overall aesthetic. Ceramic tile, glass tile, and natural stone tile are all great choices for bathroom sink backsplashes, each offering its own unique benefits. With proper installation and regular maintenance, your chosen tile will provide a beautiful and functional backsplash for years to come.
A Step-by-Step Guide for Changing the Bathroom Sink in a Rental
You may want to see also
![]()
What tools do I need to install a bathroom sink backsplash?
Installing a bathroom sink backsplash can be a great way to add both style and functionality to your bathroom. Not only does it protect the walls from water damage, but it also adds a finishing touch to your sink area. If you're considering installing a bathroom sink backsplash yourself, there are a few tools that you will need to make the process easier and more efficient.
- Measuring tape: Before you start the installation process, you will need to measure the area where the backsplash will be installed. This will help you determine the right size of the backsplash and ensure a perfect fit.
- Level: A level is necessary to ensure that your backsplash is installed straight and level. This will prevent any slanting or unevenness, giving your bathroom a professional and polished look.
- Drill: A power drill is essential for making holes in the wall for screws or anchors. It will also be used to attach the backsplash to the wall securely. Make sure to use the appropriate drill bit for your wall material, such as masonry bits for concrete or wood bits for drywall.
- Screwdriver: Depending on the type of screws or wall anchors you are using, you may need a screwdriver to tighten them securely. Choose a screwdriver that matches the type of screws you are using, whether it be Phillips or flathead.
- Caulking gun: A caulking gun is necessary for applying caulk along the edges of the backsplash. Caulk helps to seal any gaps between the backsplash and the sink, preventing water from seeping in and causing damage. Choose a caulk that is mold and mildew resistant for added durability.
- Putty knife: A putty knife is useful for spreading caulk evenly along the edges of the backsplash. It helps to create a neat and smooth finish.
- Safety goggles and gloves: Safety should always be a top priority when using power tools. Protect your eyes with safety goggles and your hands with gloves to prevent any accidents or injuries.
Now that you have gathered all the necessary tools, here is a step-by-step guide to installing a bathroom sink backsplash:
- Measure the area: Use a measuring tape to determine the dimensions of the area where the backsplash will be installed. Take into account the width and height you want the backsplash to be.
- Mark the area: Use a pencil or marker to mark the dimensions of the backsplash on the wall. This will serve as a guide during installation.
- Pre-drill holes: If your backsplash requires screws or anchors, use a power drill to pre-drill the holes at the marked locations. This will prevent any cracking or splitting of the backsplash material.
- Attach the backsplash: Line up the pre-drilled holes on the backsplash with the holes on the wall. Use a screwdriver or drill to secure the backsplash in place. Make sure it is straight and level by using a level.
- Apply caulk: Load a caulk cartridge into the caulking gun and cut the tip of the cartridge at a 45-degree angle. Apply a thin bead of caulk along the edges of the backsplash, smoothing it out with a putty knife.
- Clean and finish: Use a damp cloth to clean off any excess caulk and give the backsplash a polished look. Allow the caulk to dry according to the manufacturer's instructions before using the sink.
Installing a bathroom sink backsplash can be a rewarding DIY project that adds value and beauty to your bathroom. Follow these steps and use the necessary tools to achieve professional-looking results. With a little time and effort, you can enjoy a stylish and functional addition to your bathroom.
How to Achieve a Stunning Silver Finish on Solid Pebble Bathroom Flooring
You may want to see also
![]()
Are there any specific techniques for cutting and installing tiles around a bathroom sink and faucet?
Installing tiles around a bathroom sink and faucet can be a challenging task, but with the right techniques and tools, it can be accomplished with professional-looking results. Here are some specific techniques for cutting and installing tiles around a bathroom sink and faucet:
- Measure and plan: Before you start cutting and installing tiles, it's important to measure the area around the sink and faucet accurately. Plan the layout of the tiles, considering the size and shape of the tiles, as well as any pattern or design you want to create.
- Use a tile cutter: To cut the tiles accurately, use a tile cutter specifically designed for the type of tiles you are using. Tile cutters come in different styles, such as manual score-and-snap cutters or electric wet saws. Follow the manufacturer's instructions for the specific tile cutter you are using.
- Mark the tiles: Before cutting the tiles, mark them with a pencil or a tile marker to indicate the cutting lines. Use a straightedge or a template to ensure straight and accurate lines.
- Safety precautions: When using a tile cutter, wear safety goggles and gloves to protect your eyes and hands from flying debris. Follow safety guidelines and precautions provided by the manufacturer.
- Cut the tiles: Use the tile cutter to score the surface of the tile along the marked line. Apply even pressure and avoid rushing the process. Once the surface is scored, use the tile cutter's breaking mechanism or a pair of tile nippers to snap the tile along the scored line.
- Smooth the edges: After cutting the tiles, you may need to smooth the edges using a tile file or sandpaper. This will ensure a proper fit and a seamless installation.
- Test-fit the tiles: Before applying adhesive or mortar, test-fit the cut tiles around the sink and faucet. Make any necessary adjustments or trimmings to ensure a precise fit.
- Apply adhesive or mortar: Using a notched trowel, apply a thin layer of adhesive or mortar to the back of each tile. Carefully press the tiles into place, making sure they are level and aligned.
- Grouting: Once the tiles are installed and the adhesive or mortar has dried, it's time to grout the joints. Mix the grout according to the manufacturer's instructions and apply it evenly using a grout float. Wipe off excess grout with a damp sponge, taking care not to wash away the grout from the joints.
- Seal the tiles: After the grout has dried, it's essential to seal the tiles to protect them from stains and moisture. Choose a suitable tile sealer and apply it according to the manufacturer's instructions.
By following these specific techniques for cutting and installing tiles around a bathroom sink and faucet, you can achieve a professional-looking result. Remember to take accurate measurements, use the right tools, and pay attention to detail for a successful tile installation.
How to Properly Extend the Waste Line Under a Bathroom Sink to the Wall
You may want to see also
Frequently asked questions
Before tiling a bathroom sink backsplash, it is important to ensure that the surface is clean and smooth. Begin by removing any existing tiles or wallpaper and sanding down any rough areas. Clean the surface thoroughly with a mild cleaner and allow it to dry completely before proceeding with the tiling process.
When choosing tile for a bathroom sink backsplash, it is recommended to opt for a waterproof and durable material, such as ceramic or porcelain tile. These types of tiles are resistant to moisture and are easy to clean, making them ideal for bathroom use. Additionally, consider selecting a tile that complements the overall design and style of your bathroom.
To measure and cut tiles for a bathroom sink backsplash, start by measuring the length and height of the area where the tiles will be installed. Subtract 1/8 inch from each measurement to account for spacing and ensure a proper fit. Use a tile cutter or wet saw to cut the tiles according to your measurements. It is important to wear safety goggles and take caution while using these tools.
For tiling a bathroom sink backsplash, it is recommended to use a thinset mortar adhesive. This type of adhesive is specifically designed for tile installation and provides a strong bond that can withstand moisture and frequent cleaning. Follow the manufacturer's instructions for mixing and applying the thinset mortar to ensure a proper installation.
After the tiles have been installed, allow them to set for the recommended drying time. Once the tiles are firmly in place, mix the grout according to the manufacturer's instructions and apply it to the gaps between the tiles using a grout float. Use a damp sponge to remove any excess grout and smooth the grout lines. Allow the grout to dry completely before applying a sealer to protect the tiles from stains and moisture. Follow the manufacturer's instructions for the specific sealer you are using.