
When it comes to updating your kitchen, one small change that can make a big impact is replacing your kitchen faucet. Whether you're looking to improve functionality, update the style, or fix a leak, a new faucet can bring new life to your kitchen space. But how long does it actually take to replace a kitchen faucet? In this article, we'll explore the average time it takes to complete this DIY project and provide tips to help you get the job done efficiently. So, if you're ready to give your kitchen a refresh, read on to find out how much time you should set aside for this task.
| Characteristics | Values |
|---|---|
| Average time to replace | 1-2 hours |
| Difficulty level | Easy |
| Tools required | Adjustable wrench, pliers, tape |
| Steps involved | 1. Turn off water supply |
| 2. Disconnect old faucet | |
| 3. Install new faucet | |
| 4. Connect water supply | |
| 5. Test for leaks |
What You'll Learn
![]()
Factors that Affect the Average Time to Replace a Kitchen Faucet
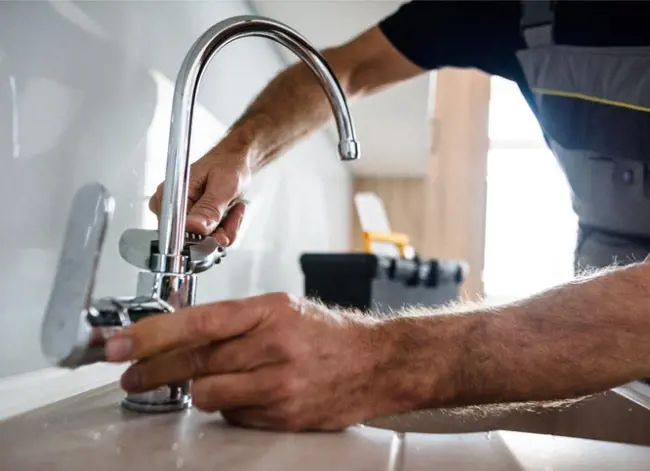
Replacing a kitchen faucet may seem like a simple task, but there are several factors that can affect the average time it takes to complete this project. The complexity of the faucet design, accessibility of the plumbing connections, and the experience and skill of the installer all play a role in determining how long it will take to replace a kitchen faucet. In this article, we will take a closer look at each of these factors and provide some tips on how to streamline the faucet replacement process.
Firstly, the complexity of the faucet design can greatly impact the amount of time it takes to replace it. Some faucets have intricate designs and components that require more time and effort to remove and replace. For example, a single-handle faucet may have several internal parts that need to be disassembled and reassembled during the replacement process. On the other hand, a simple two-handle faucet may be easier to remove and install. Before beginning the replacement process, it's important to familiarize yourself with the specific design of your faucet and gather any necessary tools or replacement parts.
Secondly, the accessibility of the plumbing connections can also affect the average time it takes to replace a kitchen faucet. If the plumbing connections are easily accessible, such as being located under the sink with ample space, the process can be relatively quick and straightforward. However, if the connections are obstructed by other fixtures or hard-to-reach areas, it may take more time and effort to disconnect and reconnect the plumbing. In some cases, you may need to remove nearby cabinets or other obstacles to gain better access to the connections. It's important to assess the accessibility of the plumbing connections before starting the replacement process and make any necessary adjustments to improve access.
Lastly, the experience and skill of the installer can significantly affect how long it takes to replace a kitchen faucet. An experienced plumber or DIY enthusiast who has replaced faucets before will likely be able to complete the project more quickly than someone who is doing it for the first time. Experience allows for a better understanding of the necessary steps and potential challenges that may arise during the replacement process. Additionally, having the right tools and knowing how to use them effectively can save a considerable amount of time. If you're not confident in your abilities or lack experience, it may be worth considering hiring a professional to ensure the job is done efficiently and correctly.
To streamline the faucet replacement process, here are a few additional tips:
- Gather all the necessary tools and replacement parts before starting the project to avoid unnecessary delays or trips to the hardware store.
- Turn off the water supply to the faucet before beginning the replacement process to prevent any leaks or water damage.
- Use a bucket or towels to collect any excess water that may drain from the pipes when disconnecting the old faucet.
- Take pictures or make notes of the existing plumbing connections before removing the old faucet to make it easier to reconnect the new one.
- Follow the manufacturer's instructions for the specific faucet model you are working with to ensure proper installation and functionality.
- Test the new faucet for any leaks or issues once it's installed, and make any necessary adjustments or repairs.
By considering the complexity of the faucet design, accessibility of the plumbing connections, and the experience and skill of the installer, you can estimate the average time it will take to replace a kitchen faucet. Following the tips provided will help streamline the process and ensure a successful faucet replacement. If you're unsure or uncomfortable with any aspect of the project, it's always a good idea to consult a professional for assistance.
How to Determine Which Kitchen Sink Faucet Best Fits Your Needs
You may want to see also
![]()
Step-by-Step Guide for Replacing a Kitchen Faucet
A kitchen faucet is one of the most frequently used fixtures in your home, so it's not surprising that it may occasionally require replacement. If you're considering replacing your kitchen faucet, don't worry! With a little bit of preparation and a few basic tools, you can easily tackle this DIY project. In this step-by-step guide, we'll walk you through the process so you can have your new faucet installed in no time.
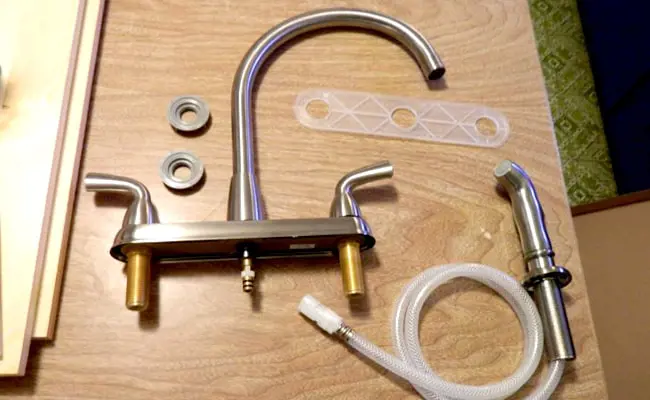
Step 1: Gather the Necessary Tools and Materials
Before you start the replacement process, it's important to gather all the tools and materials you'll need. Here's a list of what you'll typically need for this project:
- Adjustable wrench
- Plumber's tape
- Bucket
- Towels
- New kitchen faucet
- Supply lines (if not included with the faucet)
Make sure you have these items on hand before moving on to the next step.
Step 2: Shut off the Water Supply
To avoid any potential water damage or flooding, it's crucial to shut off the water supply before starting the replacement process. Locate the shut-off valves underneath the sink and turn them clockwise until they're completely closed. Once the water supply is turned off, turn on the faucet to release any remaining water in the pipes.
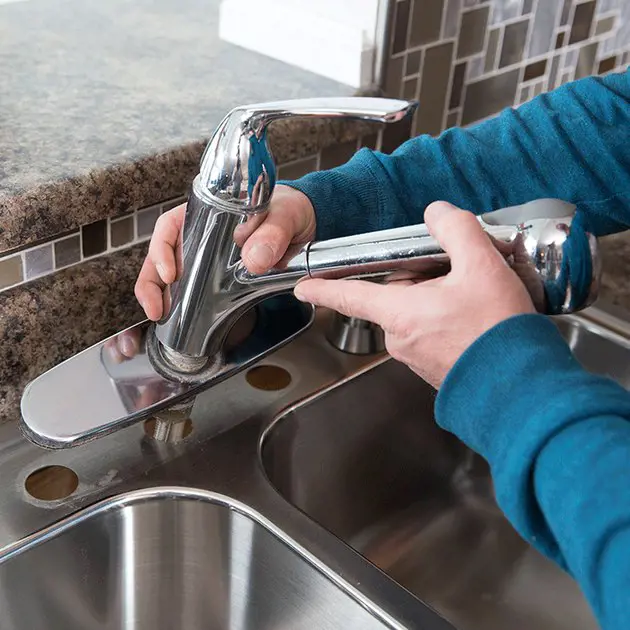
Step 3: Disconnect the Existing Faucet
Now that the water supply is shut off, it's time to disconnect the old faucet. Begin by disconnecting the supply lines from the faucet using an adjustable wrench. Place a bucket underneath to catch any water that may drip out. Next, remove the nuts securing the faucet to the sink using the same wrench. Once the nuts are removed, lift the old faucet out of the sink.
Step 4: Prepare the Area for the New Faucet
Before installing the new faucet, thoroughly clean the sink area to ensure a clean and smooth installation. Use a mild detergent or cleaner to remove any debris, grease, or grime. Dry the sink with towels to ensure it's completely clean and ready for the new faucet.
Step 5: Install the New Faucet
Take the new faucet out of the packaging and read the manufacturer's instructions carefully. Every faucet model may have specific installation steps, so it's important to follow the instructions provided. Typically, you'll need to insert the new faucet into the sink's mounting holes and secure it with the supplied nuts or brackets. Make sure the faucet is centered and level before tightening the nuts.
Step 6: Connect the Plumbing Connections
Once the new faucet is securely installed, it's time to connect the plumbing. Start by attaching the supply lines to the corresponding hot and cold water valves. Use plumber's tape to ensure a tight and leak-free connection. Tighten the connections with an adjustable wrench, being careful not to overtighten.
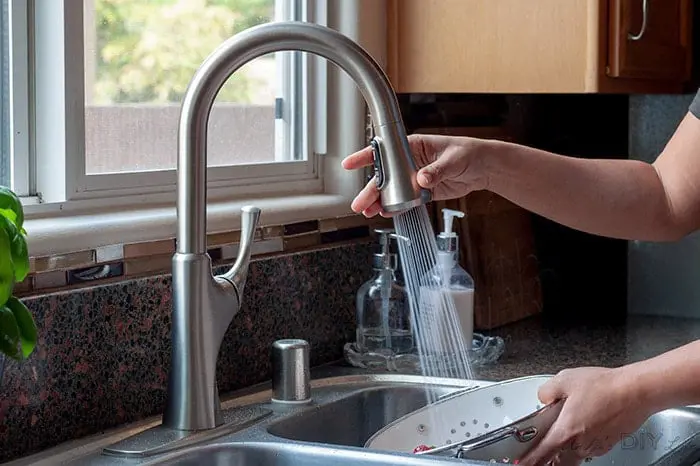
Step 7: Turn on the Water Supply and Test the Faucet
With the new faucet and plumbing connections in place, it's time to turn on the water supply. Turn the shut-off valves counterclockwise to open them fully. Check for any leaks or drips around the supply lines and make any adjustments if necessary. Once everything is leak-free, turn on the faucet and let the water run for a few minutes to flush out any debris.
Congratulations! You've successfully replaced your kitchen faucet. Now you can enjoy the fresh new look and functionality of your updated fixture. Remember to retain the old faucet and any associated warranties or paperwork in case you encounter any future issues.
Pros and Cons of Installing a Corbel on Your Kitchen Island
You may want to see also
![]()
Tips to Expedite the Faucet Replacement Process
Replacing a faucet can be a time-consuming process, but there are ways to expedite it and make sure everything goes smoothly. In this article, we will discuss three tips to help you expedite the faucet replacement process.
Choose a Simplified Faucet Design:
When selecting a new faucet, opt for a simplified design that is easy to install. Look for faucets that come with clear instructions and require minimal tools for installation. This will save you time and frustration during the process. Additionally, choose a faucet that has easily accessible plumbing connections. This will make it easier for the installer to connect the new faucet to the existing plumbing system.
Ensure Easy Access to the Plumbing Connections:
Before starting the faucet replacement process, make sure to clear the area around the sink. Remove any clutter and items that might obstruct access to the plumbing connections. This will allow the installer to work efficiently and quickly without any unnecessary delays. Additionally, if there are any cabinets or drawers under the sink, clear them out to provide easy access to the pipes and plumbing connections.
Prioritize Experience and Skill in the Installer:
Hiring a professional installer who has experience and skill in faucet replacements can significantly expedite the process. Look for licensed plumbers or experienced handyman services that specialize in faucet installations. These professionals have the knowledge and expertise to complete the replacement quickly and efficiently. They can also handle any unexpected issues that may arise during the process, saving you time and potential headaches.
In conclusion, replacing a faucet doesn't have to be a long and tedious process. By choosing a simplified faucet design, ensuring easy access to the plumbing connections, and prioritizing experience and skill in the installer, you can expedite the faucet replacement process and have your new faucet up and running in no time. Remember to carefully follow the manufacturer's instructions and consult a professional if you're unsure about any step of the process.
Fixing a Dripping Delta Kitchen Faucet: Step-by-Step Guide
You may want to see also
![]()
Average Time Estimates for Replacing a Kitchen Faucet
Replacing a kitchen faucet may seem like a daunting task, but with the right tools and a step-by-step guide, you can successfully complete the project in a reasonable amount of time. The average time estimates for replacing a kitchen faucet can vary depending on the complexity of the installation and other factors. In this article, we will explore the time estimates and additional factors that can extend the time needed for a successful faucet replacement.
Simple Faucet Replacement: 1 to 2 hours
For a simple faucet replacement, where the new faucet is similar in style and configuration to the old one, you can expect the entire process to take around 1 to 2 hours. This estimate includes the time required to gather the necessary tools, turn off the water supply, remove the old faucet, install the new one, and test for leaks.
To start with, gather the following tools: an adjustable wrench, pliers, a bucket or towel to catch any water that may spill, a flashlight, and plumber's tape. Before you begin, make sure to turn off the water supply valves under the sink.
Next, remove the old faucet by disconnecting the supply lines and unscrewing the mounting nuts. You may need a basin wrench to reach and loosen these nuts. Once the old faucet is removed, clean the sink area and install the new faucet following the manufacturer's instructions. Don't forget to use plumber's tape to ensure a watertight seal.
Complex Faucet Replacement: 2 to 4 hours
In some cases, the faucet replacement can be more complex, especially if the new faucet has a different configuration or requires additional modifications. This can include installing a soap dispenser, an air gap for a dishwasher, or even rerouting the plumbing lines.
For complex faucet replacements, you can expect the process to take around 2 to 4 hours. This estimate includes the time needed to gather the necessary tools, turn off the water supply, remove the old faucet, make any necessary modifications, install the new faucet and additional components, and test for leaks.
When tackling a complex faucet replacement, it is crucial to carefully read and understand the manufacturer's instructions. This will ensure that you correctly install any additional components and make the necessary modifications to the plumbing lines if required.
Additional Factors that Can Extend the Time Needed
While the estimated time for replacing a kitchen faucet may range from 1 to 4 hours, there are additional factors that can extend the time needed to complete the project. These factors include:
- Difficulty accessing the faucet: If the faucet is located in a hard-to-reach area or if there are tight spaces under the sink, it may take longer to remove the old faucet and install the new one.
- Plumbing issues: If you discover any plumbing issues, such as corroded pipes or leaks, during the installation process, it is essential to address them before proceeding with the faucet replacement. This can add additional time to the project.
- Lack of experience: If you are new to DIY home improvement projects or have never replaced a faucet before, it is natural to take a bit longer to complete the task. However, with patience and careful following of instructions, you can still successfully replace the faucet.
In conclusion, the average time estimates for replacing a kitchen faucet range from 1 to 2 hours for a simple replacement and 2 to 4 hours for a more complex replacement. Additional factors such as accessibility, plumbing issues, and personal experience can extend the time needed to complete the project. Remember to gather the necessary tools, turn off the water supply, follow the manufacturer's instructions, and test for leaks to ensure a successful faucet replacement.
The Effectiveness of Water Hammer Arresters on Kitchen Faucets
You may want to see also
Frequently asked questions
On average, it takes about one to two hours to replace a kitchen faucet. However, the time can vary depending on the complexity of the installation and the experience level of the person doing the replacement.
Replacing a kitchen faucet typically requires basic tools such as a wrench, pliers, and a screwdriver. Some faucets may have specific requirements, so it's a good idea to check the manufacturer's instructions or consult a professional if you're unsure.
Many homeowners are able to replace their kitchen faucet themselves. However, if you don't have any plumbing experience or aren't comfortable working with tools, it may be best to hire a professional to ensure the job is done correctly. Additionally, if you encounter any unexpected issues during the replacement process, a professional plumber will have the knowledge and expertise to handle them.
Yes, several factors could affect the time it takes to replace a kitchen faucet. These include the condition of your current plumbing, the type of faucet being installed, and any unforeseen complications that may arise during the process. It's always a good idea to allocate extra time for unexpected challenges or seek professional assistance if necessary.