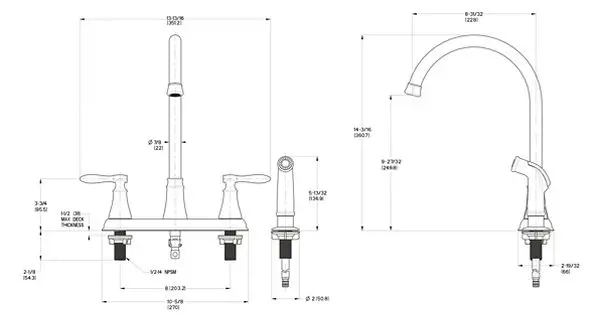
Stop valves are a vital component in any kitchen faucet system, as they regulate the flow of water and allow for easy maintenance and repairs. While the size of a typical stop valve for a kitchen faucet may vary depending on the specific model, there are some standard measurements that can give you an idea of what to expect. From compact and space-saving options to larger and more robust designs, stop valves in the kitchen come in all shapes and sizes to cater to the needs of various households.
| Characteristics | Values |
|---|---|
| Material | Brass |
| Size | 1/2 inch |
| Handle Type | Lever |
| Connection Type | Threaded |
| Maximum Working Pressure | 150 psi |
| Maximum Working Temperature | 200°F |
| Inlet and Outlet | Female x Female |
| Valve Type | Globe Valve |
| Flow Control | Yes |
| Certifications | NSF, UPC, cUPC, ADA, CA |
| Finish | Chrome, Stainless Steel |
| Warranty | Limited Lifetime |
What You'll Learn
![]()
Types of stop valves for a kitchen faucet

When it comes to selecting the right stop valve for your kitchen faucet, it's important to understand the different types available in the market. The right choice can ensure smooth water flow control, easy maintenance, and durability. In this article, we will discuss three common types of stop valves for kitchen faucets: compression stop valves, quarter-turn stop valves, and ball valve stop valves.
Compression Stop Valves:
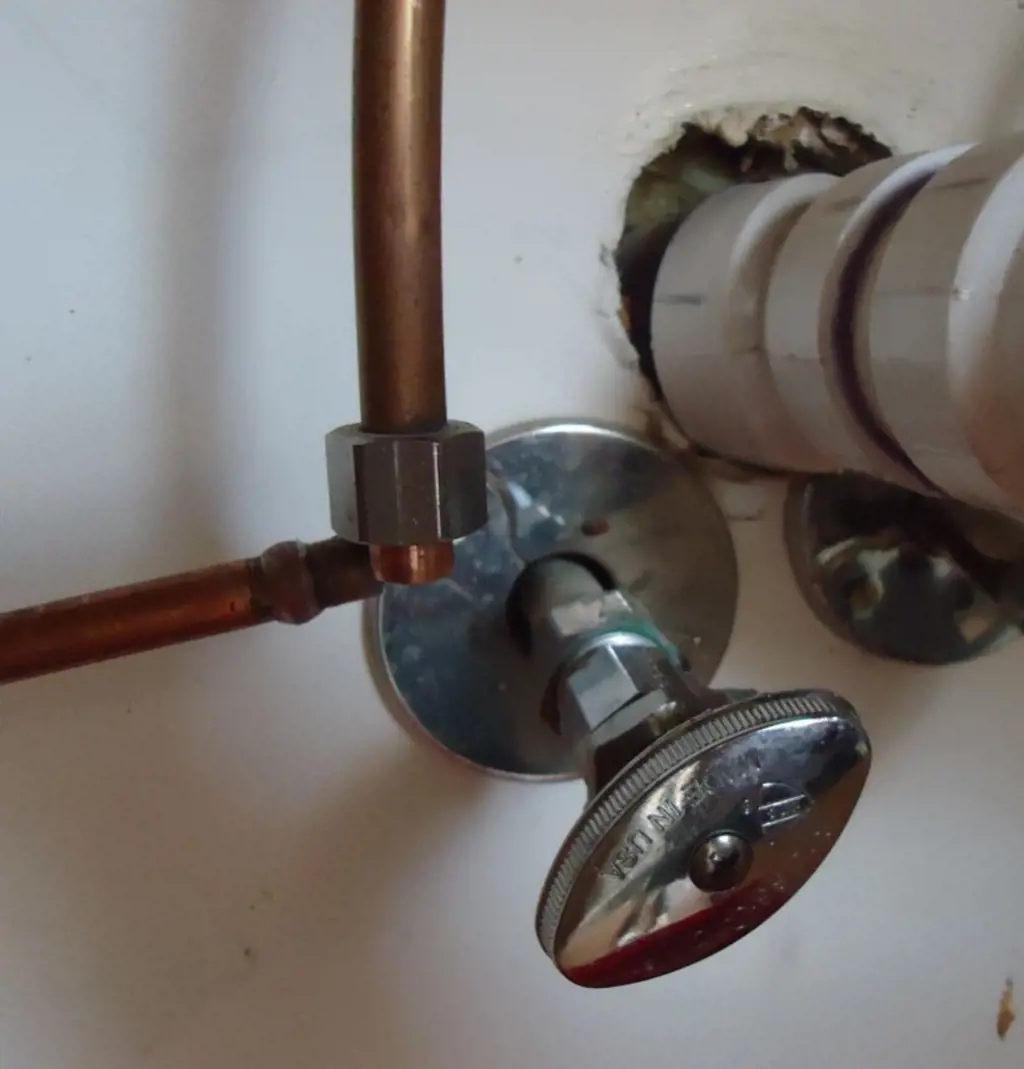
Compression stop valves are one of the oldest types of stop valves and are still commonly used today. They consist of a compression nut, a compression ring (also known as a ferrule), and a valve body with a threaded compression nut. This type of valve requires a wrench or adjustable pliers to tighten and create a watertight seal.
To install a compression stop valve, start by shutting off the water supply. Next, use a tubing cutter to cut the copper pipe cleanly and smoothly. Slide the compression nut, then the compression ring onto the pipe, followed by the valve body. Tighten the compression nut with a wrench until it forms a tight seal. Check for leaks by turning on the water supply.
Pros:
- Inexpensive and readily available.
- Suitable for both hot and cold water supply.
- Easy to install and replace.
Cons:
- Requires regular maintenance to prevent leaks.
- May develop leaks over time due to wear and tear on the compression ring.
Quarter-Turn Stop Valves:
Quarter-turn stop valves, also known as 90-degree stop valves or ball valves, are popular due to their ease of use and reliability. As the name suggests, these valves only require a quarter turn to open or close, making them convenient for controlling water flow.
To install a quarter-turn stop valve, shut off the water supply and cut the copper pipe as needed. Slide the valve onto the pipe and tighten using a wrench. Turn the valve handle a quarter turn clockwise to shut off the water supply, and a quarter turn counterclockwise to open it.
Pros:
- Quick and easy to operate.
- Durable and long-lasting.
- Do not require regular maintenance.
Cons:
- More expensive than compression stop valves.
- Not suitable for tight spaces due to their larger size.
Ball Valve Stop Valves:
Ball valve stop valves are similar to quarter-turn stop valves but have additional features. They use a ball with a hole in the middle to control water flow. When the hole in the ball lines up with the pipe, water flows through, and when the ball is turned, the hole is blocked, stopping the water flow.
To install a ball valve stop valve, shut off the water supply, cut the copper pipe, and slide the valve onto the pipe. Tighten using a wrench and turn the handle clockwise to shut off the water flow.
Pros:
- Durable and long-lasting.
- Suitable for high-pressure applications.
- Easy to operate and control water flow precisely.
Cons:
- More expensive than other types of stop valves.
- Larger in size, requiring more space for installation.
In conclusion, understanding the different types of stop valves for kitchen faucets can help you make an informed decision. Compression stop valves are budget-friendly but require regular maintenance. Quarter-turn stop valves are easy to operate and reliable but more expensive. Ball valve stop valves offer precise control and durability but at a higher cost. Consider your specific needs and preferences to select the right stop valve for your kitchen faucet.
Removing Kitchen Sterling Faucet Handles Made Easy with These Simple Steps
You may want to see also
![]()
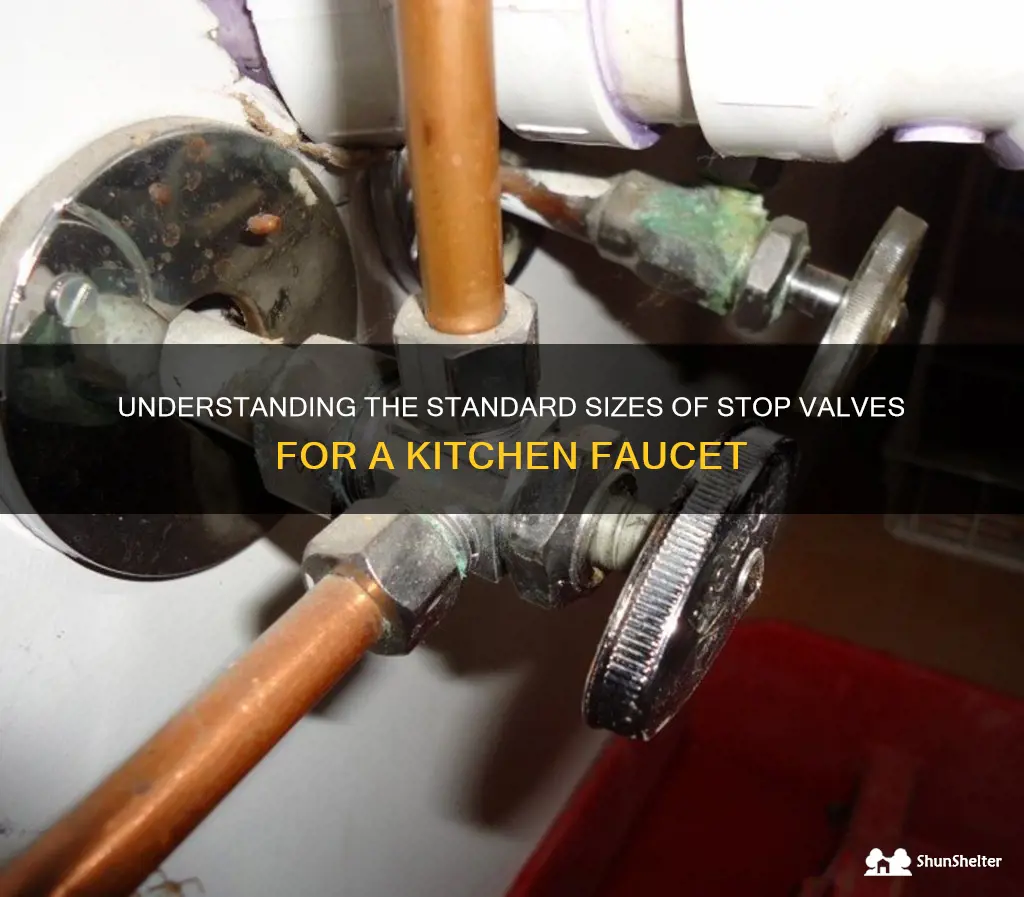
Typical sizes of stop valves for a kitchen faucet
When it comes to kitchen faucets, one important component that often goes unnoticed is the stop valve. This valve allows you to control the flow of water to your faucet, making it an essential part of any kitchen plumbing system. Stop valves come in various sizes, but two of the most common are 1/2 inch and 3/8 inch.
Firstly, let's talk about the 1/2 inch stop valves. These valves are typically used for residential kitchen faucets. They have a larger opening, allowing for a greater volume of water to flow through. If you have a standard-sized kitchen faucet, chances are it will require a 1/2 inch stop valve.
When installing a 1/2 inch stop valve, it is essential to use a 1/2 inch compression fitting to connect to the water supply line. The compression fitting ensures a watertight connection, preventing any leaks. To install the valve, simply thread the compression fitting onto the valve and tighten it using an adjustable wrench.
On the other hand, 3/8 inch stop valves are commonly used in older homes or with smaller kitchen faucets. These valves have a smaller opening, allowing for a lower volume of water to flow through. If you have a smaller kitchen faucet, it is likely that you will need a 3/8 inch stop valve.
When installing a 3/8 inch stop valve, you will need a 3/8 inch compression fitting for the water supply line. Like with the 1/2 inch valve, thread the compression fitting onto the valve and tighten it using an adjustable wrench.
It is worth noting that these are the most commonly used sizes for stop valves, but they are not the only options available. Plumbing systems can vary, and it is always a good idea to consult a professional if you are unsure about which size stop valve to use for your kitchen faucet.
In conclusion, the size of the stop valve for a kitchen faucet is an important consideration when installing or replacing a faucet. The 1/2 inch stop valve is commonly used for residential kitchen faucets and requires a 1/2 inch compression fitting to connect to the water supply line. The 3/8 inch stop valve, on the other hand, is commonly used in older homes or with smaller kitchen faucets and requires a 3/8 inch compression fitting. Always ensure a watertight connection by tightening the compression fitting with an adjustable wrench.
The Evolution of the Modern Kitchen Island
You may want to see also
![]()
Factors to consider when choosing the size of a stop valve for a kitchen faucet
When it comes to choosing the size of a stop valve for your kitchen faucet, there are several factors that you need to consider. One of the most important factors is the size of the water supply line. This is because the size of the stop valve should match the size of the water supply line to ensure proper flow of water.
The size of the water supply line can vary, but most kitchen faucets have a standard size of 1/2 inch. This means that you will need a stop valve with a 1/2 inch connection. However, it's always best to check the specifications of your faucet to confirm the size of the water supply line before making a purchase.
Another factor to consider is the size of the faucet connection. The connection between the faucet and the stop valve should be a perfect match to prevent leaks and ensure a secure connection. The size of the faucet connection can vary, but most commonly, it is 3/8 inch or 1/2 inch. Again, it's important to check the specifications of your faucet to confirm the size of the connection.
Lastly, you need to consider the water pressure in your home. The water pressure can affect the flow rate of water, so it's important to choose a stop valve that can handle the water pressure in your home. Most commonly, residential water pressure ranges from 40 to 60 pounds per square inch (psi). You should choose a stop valve with a pressure rating that matches or exceeds the water pressure in your home.
In summary, when choosing the size of a stop valve for your kitchen faucet, you need to consider the size of the water supply line, the size of the faucet connection, and the water pressure in your home. By ensuring that these factors are properly matched, you can ensure proper flow of water and prevent any potential leaks or issues with your kitchen faucet.
How to Fix a Loose Kitchen Faucet and Secure It Effectively
You may want to see also
![]()
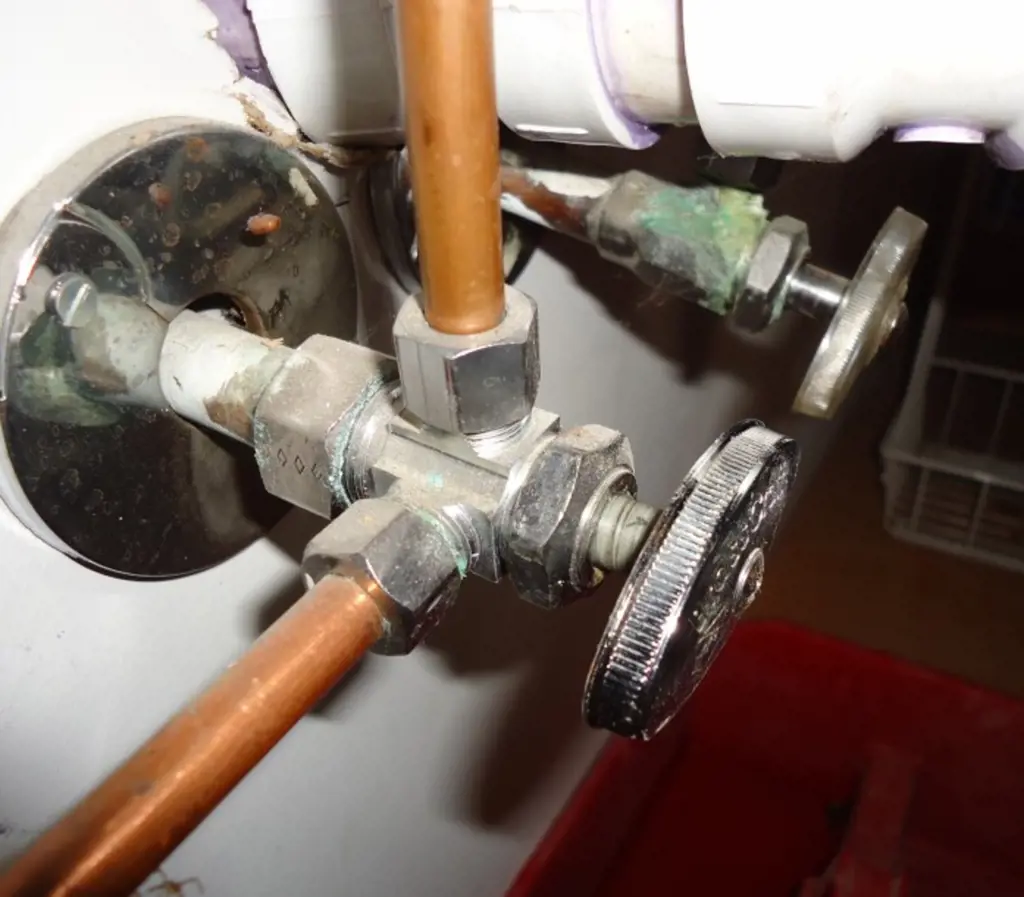
Installation considerations for stop valves in a kitchen faucet
Installing stop valves in a kitchen faucet is an essential task that ensures proper functioning and allows you to shut off the water supply when needed. When it comes to installing these valves, there are a few key considerations you need to keep in mind. This article will guide you through the process of properly shutting off the water supply before installation, using appropriate tools and techniques for a secure installation, and checking for leaks and ensuring proper functionality after the installation.
Properly Shutting Off the Water Supply Before Installation
Before you begin the installation process, it's crucial to shut off the water supply to avoid any mishaps or flooding. The water shut-off valves are usually located beneath the sink, close to the wall or floor. Turn the handle on the valve clockwise until it is fully closed. This will stop the water flow to the faucet.
Once the water supply is turned off, it's a good idea to release any remaining pressure in the system by opening the faucet and allowing the water to run until it stops. This step protects you from any potential high-pressure surprises during the installation process.
Using Appropriate Tools and Techniques for a Secure Installation
To install the stop valves, you will need a few essential tools, such as an adjustable wrench, Teflon tape, and a pipe cutter or hacksaw. These tools will help you achieve a secure and leak-free installation.
Begin by cutting the existing water pipe using a pipe cutter or hacksaw. Make sure to measure and cut the pipe precisely to allow for proper fitting of the stop valve. Once the pipe is cut, remove any burrs or rough edges to ensure a smooth connection.
Next, wrap the threaded end of the pipe with Teflon tape. This step helps create a tight seal and prevents leaks. Start wrapping the tape in a clockwise direction, covering the threads completely. Be generous with the tape, but avoid excessive overlapping to ensure a secure fit.
Now, it's time to attach the stop valve to the pipe. Use an adjustable wrench to tighten the valve onto the threaded end of the pipe. Make sure not to overtighten, as it can damage the valve or cause leaks. A snug fit is sufficient.
Checking for Leaks and Ensuring Proper Functionality After Installation
Once the stop valves are securely installed, it's crucial to check for leaks and ensure that everything is functioning properly. Turn the water supply back on by turning the shut-off valve counterclockwise. Slowly open the faucet and let the water flow.
Inspect the connection points, including the threaded end of the stop valve and the pipe, for any signs of leakage. If you notice any leaks, gently tighten the connections using an adjustable wrench. Avoid using excessive force, as it can cause damage.
After ensuring there are no leaks, test the functionality of the stop valves. Turn the handle on the valve clockwise to shut off the water supply. The water flow should stop completely. Turning the handle counterclockwise should restore the water flow. If the valves do not shut off or restore the water flow properly, double-check the installation and consult a professional if needed.
In summary, installing stop valves in a kitchen faucet requires careful considerations. Shutting off the water supply before installation, using appropriate tools and techniques for a secure installation, and checking for leaks and ensuring proper functionality are all crucial steps. By following these guidelines, you can install stop valves with confidence and enjoy a fully functional kitchen faucet.
Are Moen Kitchen Faucets Worth the Investment?
You may want to see also
Frequently asked questions
The typical size of a stop valve for a kitchen faucet is 3/8 inch. This size is commonly used in residential applications and is suitable for most standard kitchen faucets.
While it is possible to use a larger size stop valve for a kitchen faucet, it is generally not necessary. Most kitchen faucets are designed to accommodate the standard 3/8 inch size, and using a larger stop valve may require additional modifications to the plumbing system.
Using a smaller size stop valve for a kitchen faucet is generally not recommended. The 3/8 inch size is considered standard for kitchen faucets, and using a smaller size may result in reduced water flow and potential leaks.
Stop valves are typically not included with kitchen faucets. They are separate components that need to be purchased and installed separately. It is important to ensure that you have the appropriate size stop valve for your kitchen faucet before installation.
Installing a stop valve for a kitchen faucet is a relatively simple task that can be done by most homeowners. However, if you are not comfortable with plumbing tasks or do not have the necessary tools, it is recommended to hire a professional plumber to ensure proper installation and prevent any potential issues in the future.